FAQ
-
Please see our Plasma Cutters page for information and a list of compatible cutters.
-
There are two pieces of software that are needed in order to cut parts on your CrossFire machine. The first is Autodesk Fusion 360 which is a powerful design CAD and CAM software that is free to use for hobbyists and startups with less than $100k revenue per year. This software can be downloaded from our website or directly from Autodesk. You can design your own custom 2D & 3D parts right in Fusion, or you can simply import your own part files from your favorite CAD program. Once your part is designed, you will use Fusion’s plasma CAM feature to program toolpaths based on the part geometry that you want to cut. Here you will specify cutting parameters such as cut speed, pierce delay, and lead-in geometry and Fusion will export these toolpaths as a G-code file that can be read by the machines controller software (Mach3).
The second piece of software needed is Mach3, and each CrossFire comes with unlimited access to the fully-featured trial version (500 G-code line limit). Mach3 is a controller software that communicates directly with the CrossFire electronics and is used for tasks such as jogging the torch, zeroing the axes, and executing cutting programs. The 500 g-code line limit is enough code to cut simple to intermediate complexity parts and if you decide later that you need more code for your specific project you can instantly unlock your software by purchasing from our website at any time. -
As a hobbyist, small business, student, or educator you can obtain a full, 1 year license to Fusion 360 for free. Autodesk is extremely committed to serving enthusiasts, hobbyists, startups and smaller businesses and has no plans to stop offering Fusion 360 for free to these customers. They do not, however, promise that Fusion 360 will indefinitely have a free tier, or who meets the guidelines for a free tier. Current requirements for Start-up and educational entitlements can be found here.
To activate your start-up, hobbyist, or student licence please follow the instructions here. -
Up until now, CNC plasma cutting technology was restricted to industrial applications because the cost was prohibitively high. When Langmuir Systems sought to bring CNC plasma cutting machines to the masses, the cheapest CNC plasma cutting system on the market that was labeled as a 'hobby-level' machine was $5,000 and was lacking several key features out of the box. We felt that this was hardly a solution for the everyday builder given the incredibly high price tag for such an incomplete machine. Over the next few years, the engineering team at Langmuir Systems was hard at work with one simple goal in mind; develop a useable and accurate CNC plasma machine that can be afforded by the masses. What resulted was the CrossFire™ CNC plasma machine capable of making highly accurate parts right out of the box featuring an integrated cutting table, rolling stand, self-compensating electro-mechanical drive system, plug-n-play electronics system, and USB compatibility. At Langmuir Systems we are continuously dedicated to bringing high quality and affordable industrial technology to our customers; over the past decade we have witnessed the explosion of the makerspace community and we hope that our contribution with this machine will continue to see this movement flourish.
-
The CrossFire™CNC plasma machine was designed to be a complete out-of-the box solution for CNC plasma cutting. It includes everything that is needed to begin making parts with the exception of a computer and a plasma cutter (both of these items can be purchased from us directly during checkout). Below is a snapshot of what is included with your basic machine purchase:
- Complete two-axis CNC plasma cutting machine - just attach your plasma torch and start cutting.
- All assembly and motion control hardware included
- Two NEMA 23 stepper motors and complete plug & play electronics motion control unit
- Machine slats, table legs, rigid all-steel powder coated frame, hand/machine torch mount, 2.5 ft cable routing pole, variable thickness tip-to-work shims, and a torch quick-release hex key
- All electronics cables including 120V power cord, USB cable, Torch ON/OFF wiring, and motor cables
- Manual Z-axis height control and quick-adjustment knob
- Autodesk Fusion 360 CAD Design Software and CAM Toolpath Generation Software (Free to use for hobbyists and small startups).
- Trial Mach3 Motion Control Software (includes enough lines of code for basic to intermediate shapes, 500 G-code line limit)
- Unlimited access to Langmuir Systems Project Files
- Detailed Assembly Instructions and User Guide
- Access to lifetime customer support
- 12 Month Factory Warranty
-
The schematic below shows the overall floor space and height requirements that are needed to operate this machine. All dimensions shown are in inches.
![]()
-
The plasma cutting process is capable of cutting most types of metals and alloys. Typically this includes steel, stainless steel, aluminum, titanium, copper, and brass; although many other ferrous and non-ferrous metals are possible. Please consult your respective plasma cutter manufacturer to obtain a full list of materials that can be cut with your machine.
-
The CrossFire™ CNC machine was designed as a personal garage-sized table with maximum travel limits of 25.3" (X) x 23.3" (Y) x 3.0" (Z). The X and Y axis travel is controlled electronically by the stepper motors and the Z axis height is adjusted manually with the quick adjustment height control knob.
-
The total machine weight is approximately 110 lbs (50 kg). Each machine includes four swivel rolling casters (2 locking) for increased portability.
-
The maximum rated travel speed of this machine is 250 IPM (inches per minute).
-
The maximum material weight that can be supported by the slat table surface is 200 lbs (90 kg).
-
The maximum plate thickness that can be supported by this machine is 1" (25.4mm) steel plate. While the CrossFire™ CNC machine is capable of supporting material of up to 1" thickness for cutting, the maximum cutting thickness for your setup will be dependent on the specific plasma cutter that you are using. For example, the RAZORWELD Vipercut 30i is rated for continuous cutting of 1/4" thickness but is also rated for severance cutting of up to 3/4" material. We advise you to consult your respective plasma cutter manufacturer to obtain relevant information related to maximum cutting thickness of your machine.
-
Typical hand-held plasma cutting machines are rated for minimum cut thickness of 26 gauge (0.018"). We advise you to consult your respective plasma cutter manufacturer to obtain relevant information related to minimum cutting thickness information your machine.
-
A water table is simply a tray filled with water that surrounds the slat bed of a gantry-style CNC plasma machine. The tray is filled with water to below the top surface of the slat bed so that the action of plasma cutting (forced air) causes water in the tray to splash back up onto the backside of the part being cut. This allows for part cooling, reduces cutting noise, decreases part warpage, reduces arc flash, and reduces smoke and cutting dust.
A water table is not required for operation of the CrossFire™ CNC plasma machine and it is not provided standard with the basic table kit. Many CNC plasma tables are capable of operation without a water tray or a spray coolant system, but thermal warpage can be an issue when cutting materials thinner than 1/8" thick. The reason for this distortion is that plasma cutting imparts a large amount of heat energy into the material and the resulting thermal gradient can cause a part to warp. When the part warps, it can stick above the original flat surface of the plate and interfere with the movement of the torch. As a result, we strongly recommend using some type of cooling system when cutting thinner material to prevent warpage that may potentially ruin your part; especially when high detailed cutting such as artwork is required (high localized heat input). If you are not able to purchase a water table, we have had an equal amount of success by using a standard spray water bottle and continuously spraying the plasma arc with the water bottle during cutting to cool the part. Do not worry about extinguishing the arc with water, plasma cutters are capable of cutting material even while completely submerged. Another option is to make your own water table.
NOTE: When cutting aluminum on a water table, it is encouraged to have the water level be at least 1/8" below the bottom surface of the material and to use proper ventilation. The reason for this is that molten aluminum can react with water to form flammable hydrogen gas which can build-up and cause an explosion if large enough concentrations come into contact with the plasma arc. In addition, aluminum-lithium allows should NEVER be cut with a water table due to the high reactivity of lithium and water.
-
No. We have found that a powered Z-axis is not required when cutting on a machine of this size. We recommend using a slightly higher cut height and also using a cooling system such as a water table on thinner material to prevent warpage which may obstruct the torch motion. We have found that cutting at the manufacturers listed 'pierce height' has no substantial decrease in consumable lifetime especially in a non-production setting. We recommend experimenting with test cuts with your plasma cutter on the CrossFire™ machine in order to dial in specific cutting parameters and to optimize cut quality and consumable lifetime.
-
The pierce height refers to the distance between the material top surface and the torch tip when the plasma arc is initiated. The cut height refers to the distance between the material top surface and the torch tip when the plasma cutter is actively cutting along a geometric tool path. Since the CrossFire™ machine does not have a powered Z-Axis, the cut height and pierce height are identical for this machine when cutting. We recommend consulting your plasma cutter manufacturer for relevant cutting parameters which should include these values for a given material and thickness. We have found that cutting at the manufacturers listed pierce height has no substantial decrease in consumable lifetime, espeically in a non-production setting.
-
All Langmuir Systems products are covered by a 12 month limited warranty on hardware and 6 month limited warranty on electronics. The terms of the warranty are listed below:
- Warranty benefits only apply to the original purchaser and expire if goods are resold. You must provide proof of purchase and your machine's unique serial number (if applicable) via email before a warranty claim may be filed.
- The buyer has 30 days after delivery to report and request to receive any missing items. Langmuir Systems will ship the missing items to the buyer within 10 business days. Langmuir Systems has the right to refuse replacement of items to any buyer that it suspects may not be truthful. The buyer is responsible for the replacement of any missing items after the 30 day period expires.
- Langmuir Systems guarantees the goods received to be defect free for a period of 12 months for
mechanical hardware and 6 months for electronics. Items that meet the following conditions will be
replaced free of charge:
- Items that are received in defective and unusable condition.
- Items that become defective and unusable after use as a result of a manufacturing, design, or material defect.
- The warranty does not cover the following types of defects:
- Defects that do not negatively affect the items functionality. Examples may include scratches, dings, dents, and surface abrasions.
- Defects that are caused by improper assembly.
- Defects that are caused by improper use.
- Defects that are caused by inadequate or incorrect routine maintenance.
- Defects that are caused by improper storage of the item or exposure of the item to the elements.
- Defects that are caused by normal wear and tear.
- If a damaged or defective item is covered by the warranty, Langmuir Systems reserves the right to request that the defective item be shipped back before supplying a replacement. Langmuir Systems will supply a shipping label to cover the expense of the return shipment. The Buyer is responsible for handling and packaging. Langmuir Systems will ship either a refurbished or brand new replacement item within 5 business days of receiving the defective item.
-
All products sold directly by Langmuir Systems are eligible for return and refund. The terms of the return and refund policy are listed below:
- Only the original buyer of the item is eligible to return the item for a refund. Proof of purchase is required in order to be eligible for a refund.
- A return must be requested within 30 calendar days following the delivery of the item. Return requests after the eligibility period will be denied.
- The buyer is responsible for all shipping and handling costs associated with shipping the item back.
- Items that are eligible for return must meet all of the following requirements:
- The item must be in unused condition.
- The item must be free of defects.
- The item must be received in the original packaging.
- Langmuir Systems will inspect the item within 5 business days of receiving it. The buyer will be informed if it passes inspection and thus is eligible for a refund.
- If Langmuir Systems concludes that the item meets the refund eligibility requirements, a refund for the original transaction amount minus a 20% restocking fee will be issued to the Buyer within 5 business days following the completion of the inspection.
- 'In person' returns require permission from Langmuir Systems in advance.
- All purchases are subject to a non-refundable 2.4% merchant transaction fee.
-
Yes. The CrossFire™ CNC plasma machine is a great first machine for anyone that is interested in trying to start a small home business with their plasma cutting services. The plasma machine is capable of supporting a large range of commercial services including piece work (job shop), prototyping, light production runs, custom signage, art work and many others. You will be able to visit our Projects Page for an idea of the type of products that can be created with the CrossFire™ machine. In addition, the CrossFire™ machine is expandable to a larger size machine (double the table area) with an upgrade expansion kit that will be available for purchase in the future from Langmuir Systems.
-
No! Only plasma cutters with blow-back start torches are compatible with the CrossFire™ CNC plasma machine. Plasma machines that operate using High Frequency (HF) start torches are not permitted for use with the CrossFire™ machine. The use of these style of plasma cutters can interfere with the sensitive electronics inside the machine enclosure which can result in erratic motor steps and permanent electronics failure. The use of this style of plasma cutter with your CrossFire™ machine will effectively void your warranty. Please contact your plasma cutter manufacture if you are unsure about what style of plasma torch is included with your plasma cutter.
-
Yes. The CrossFire™ CNC plasma machine was designed to be the first true hobby-level machine and it comes standard with an adjustable universal hand torch mount. Each machine also includes a T-handle hex key for quick-release of your hand torch for fast cutting off of the machine. A straight machine torch is also compatible with the universal torch mount that is included with the CrossFire™ machine (maximum torch body diameter permitted is 1.30").
-
All hand torches use a simple pull trigger to start the plasma arc. When this trigger is pulled, it connects two wires together and once this circuit is complete the machine initiates the plasma arc. If you were to open up the cable going from your plasma machine to your hand torch, you would find these two wires going up to the trigger. In addition, these two wires can also be found by opening up the plasma machine cabinet and finding the two small wires that go from the plasma machine electronics to the torch cable input plug. If you are unsure which two wires are used to fire the torch, we recommend disconnecting the torch and probing the input plug with a multimeter. Probe the input leads around the plug with the two prongs of the multimeter and check for continuity when the trigger is pulled. Once these two input pins are found that control torch firing, it should be straightforward to determine which wires on the inside of the cabinet are used to make this connection to the torch plug.
On the CrossFire™ electronics enclosure you will find a Torch ON/OFF port with two terminals. In addition, each CrossFire™ machine comes standard with two wires that connect to this terminal block. When the machine controller receives a G-code signal in Mach3 for torch firing (M3), the relay inside the electronics enclosure creates continuity between these two terminals. In order to fire the torch using the machine controller, the two wires from the Torch ON/OFF terminal need to be spliced into the two wires that are connected to the plasma hand torch described above. The easiest way to splice into these two wires is by using the T-Tap connectors (see image below) that were provided with your machine. Simply locate the two trigger wires inside the machine and install one T-Tap connector onto each wire. The T-Tap connectors make it so that no wire cutting or stripping is required in order to splice into a wire. Next, fasten the quick connect onto the T-Tap connector and install the other end of the wire into the Torch ON/OFF terminal block (the order of these wires is unimportant).
Some plasma machines come standard with a CNC port so that wire splicing is not required. To setup, simply plug the two wires from the Torch ON/OFF terminal block into the CNC input port on the plasma machine. Please consult with your plasma machine manufacturer to ensure that the CNC port can be used in conjunction with a hand torch. If not, you will need to manually splice as described above or use a machine torch with your plasma cutter.
****NOTE****: Please consult your individual plasma manufacturer before splicing into machine wiring. Langmuir Systems is not responsible for a voided warranty that may result.
![Image result for t tap connector]()
-
Yes. The torch mount that comes standard on the CrossFire™ is a universal torch mount and is capable of accepting both hand torches and straight machine torches. The maximum torch body diameter that can be used on the standard torch mount is 1.30". The torch firing relay system located on the electronics enclosure can easily be configured with plasma cutters that are operating a standard straight machine torch. Many of these machines come standard with a CNC port so that wire splicing is not required for automatic torch firing.
-
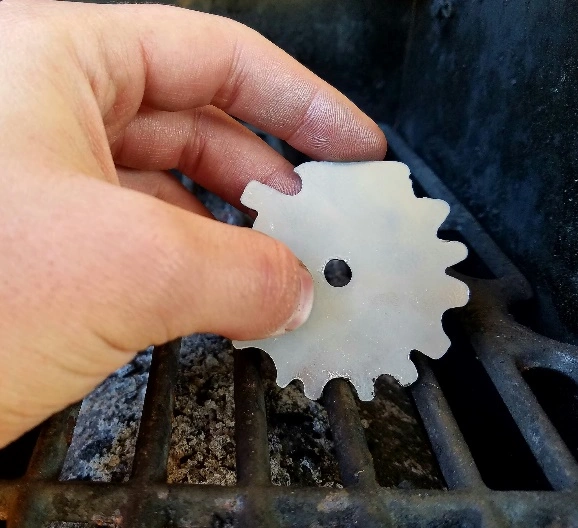
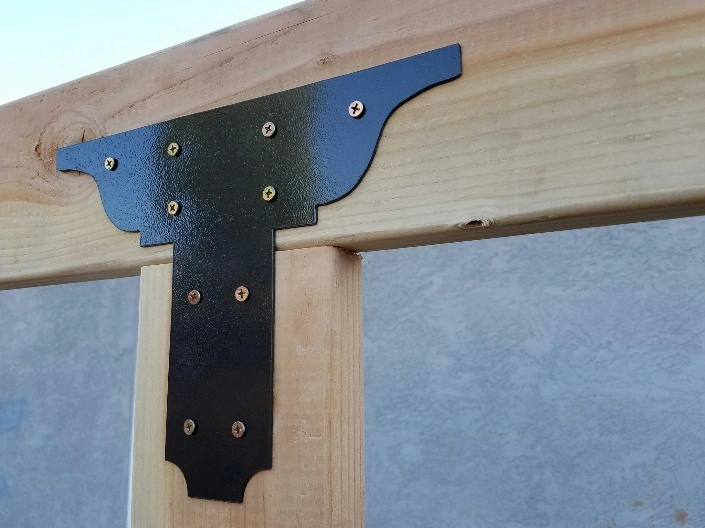
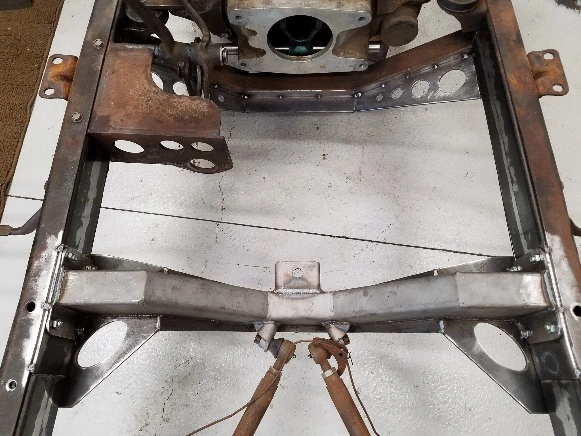
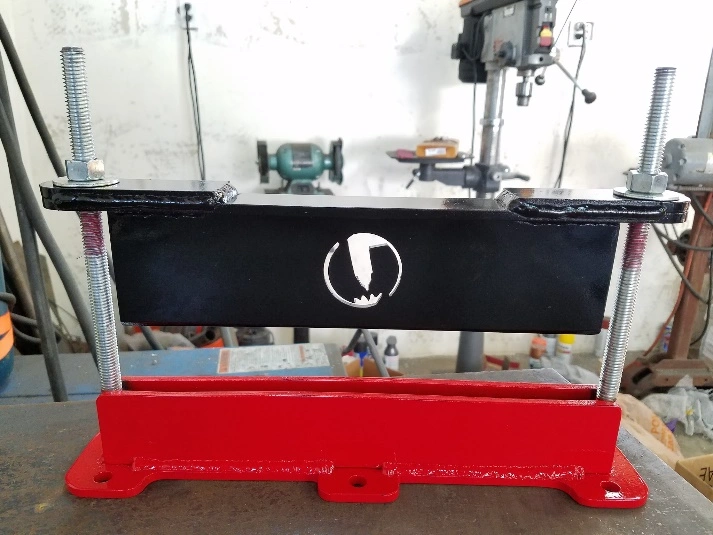
In order to keep the purchase price as low as possible on the CrossFire ™ CNC machine, we are unable to provide unlocked Mach3 controller software with the basic table price. The trial version of Mach3 is limited to 500 lines of G-code with complete functionality and can be used to cut simple and intermediate complexity parts (many customers may never have the need to purchase unlocked software). Customers have the option to purchase a complete license for Mach3 software during checkout or at any time through our online store. After purchase, you will receive a license for Mach3 software in order to instantly unlock the complete version and remove the code line limits. Below are examples of parts that were cut on the CrossFire™ machine using trail software. In addition, you can cut more complex parts with the trial version of Mach3 software by splitting up your code into multiple programs and running each one individually.
![Grill Scraper]()
![Architectural Plate]()
![Frame Crossmember]()
![Plate Bender]()
-
Yes. The table slats are considered a consumable portion of the table and they can be replaced. The purpose of the slat table is to support the material and to give free area under the part for the plasma arc to cut through uninhibited. We have found that a standard slat pack is capable of cutting thousands of parts before needing replacement. In addition one technique to increase slat lifetime is to regularly rotate slats around the table to even out the cutting exposure (outside to inside). Replacement slat packs will also be available from our online store. Conversely, you can cut your own slats from hot rolled flat bar. Each slat measures 50mm x 3mm x 33.0".
-
The CrossFire™ machine was designed to be a fully functional CNC plasma cutting machine right out of the box. Many other smaller machines on the market use a straight gantry system which limits the maximum material size to the span distance between the gantry supports. The CrossFire™ was designed as a cantilevered gantry in order to give complete and open access for material. As a result, much larger sheets of material can be cut on the machine by indexing the material in any direction. We have regularly utilized sheets of material that measure 3' x 6' which would not be possible on a traditional gantry style machine. In addition, programs can be written so that the full travel of the machine is used for the first setup, and then the material is moved a given distance and a second cutting program is started. This process can be repeated in order to cut much larger parts.
-
Yes. The CrossFire™ CNC machine comes ready to cut right out of the box and add-on options are not required to run the table. If you purchase the machine and decide later that you'd like to outfit your machine with one of our add-ons, you will be able to purchase these items from our online store at any time. Please note that many of the add-on options are discounted at checkout and may be more expensive when purchasing individually.
-
The CrossFire™ machine arrives as a kit that requires partial assembly. The assembly process itself is simple and the assembly instructions are very straightforward. We recommend reserving about 2-3 hours of time to complete the assembly process and the alignment procedure. The Assembly Manual will contain a complete description of the assembly process and tools that are required.
-
No. The CrossFire™ CNC plasma machine was purpose built exclusively for plasma cutting and routing is not supported.
-
Due to safety concerns, we do not recommending using your CrossFire™ CNC machine for laser engraving.
-
All mechanical parts on the CrossFire™ machine will be available for purchase in the event of accidental damage or wear.
-
The positional accuracy of this machine is 0.002" over 12". The positional repeatability of this machine is 0.0005".
-
The CrossFire™ machine ships in one box that measures approximately 10" x 12" x 44" and weighs roughly 115lbs.
-
This squeaking is a result of the lead screws interacting with the delrin lead nuts. In order to eliminate this squeaking, simply apply a light coat of grease or oil along both X and Y-axis lead screws and jog the machine around to fully coat each lead screw.
-
Either a laptop or a desktop computer is compatible with the CrossFire™ CNC plasma machine. The only two computer requirements for operating this machine are a computer running Windows XP/Vista/7/8/10 and a functioning USB port. We have found, however, that running a laptop computer mounted on our swivel Laptop Stand is the most ergonomic setup when operating this machine.
-
You will be able to consult the User Guide for a complete list of instructions for machine calibration.
-
The torch mount assembly includes a stainless steel thumb screw which secures the torch slide to the X-axis torch carriage. In order to adjust the torch height, the user simple unscrews the thumb screw and manually adjusts the height of the torch assembly by lifting up or pushing down on the torch. We recommend using one of the cut height shims that are provided with the table in order to quickly set the cut height to either 0.0625" or 0.125". Simple place the shim between the tip of the torch and the top surface of the plate to be cut and tighten the thumb screw to secure the torch height.
-
Yes. A program can be paused in the middle only when the plasma torch is off (for example when moving between subsequent cuts). Simply press the space bar on your computer to pause the program in the middle of a rapid move. This will allow you to manually adjust the torch height as necessary. When you are ready to continue the program, press Cycle Start (Alt-R).
-
You will be able to consult the User Guide for a complete maintenance schedule for your CrossFire ™ CNC plasma machine.
-
The CrossFire™ CNC machine uses multi-start lead screws and custom anti-backlash wear compensating lead nuts in order to provide smooth and accurate motion to both X and Y axes.
-
No. The Mach3 control software is only capable of running on a windows based computer.
-
Yes. Please proceed with the checkout process in order to obtain specific shipping rates for your international shipping destination.
-
Langmuir Systems offers lifetime support for your CrossFire™ CNC machine. We are available via email during normal business operating hours.
-
Yes. The CrossFire™ machine comes standard with four legs mounted on swivel casters so that the table can be moved away and stored when not in use. Two of these swivel casters are locking so that the table can be secured in place when cutting.
-
Yes. The CrossFire™ machine was designed so that the slats could be removed when necessary. If you need to make a cut on a part that will not fit on the table surface, simple remove the slats and center slat holder for complete access to the inside of the table.
-
Any CAD software that can output standard two or three dimensional part files (DXF, SVG, IGES, STEP, etc.) can be used. These part files can be easily imported into Autodesk Fusion 360 for toolpath generation in the CAM portion of the software.
-
Don't panic! The CrossFire™ machine was designed so that the drive motors will stall out in the event of a machine crash. We highly recommend that you perform a re-alignment of your machine after a crash in order to ensure that positional accuracy is maintained. You will be able to consult the User Guide for a complete list of instructions for machine calibration.
-
Each machine comes standard with 10 slats. The spacing between each slat is approximately 3".
-
The basic work flow when cutting parts is DESIGN → PROGRAM → CUT. The CAD software (Autodesk Fusion 360) is first used to design your part digitally according to your specific requirements. Next, the CAM suite in Autodesk Fusion 360 is used to program the toolpaths that will be used by the CrossFire™ machine's controller to execute the desired cut on your part. During the CAM process, you enter relevant information for cutting such as pierce delay, cutting speed, and lead-in geometry. For more information regarding the software used on the machine, you will be able to visit our software help.
-
The CrossFire™ CNC plasma table will retail for $1495. We encourage potential customers to act now during pre-orders to take advantage of discounted pricing and to be among the first users to own the machine several months before they are available for retail purchase.
-
The CrossFire™ CNC plasma table has one power input on the electronics enclosure. The input requirements for this are a standard AC 120V/15A U.S. wall socket. In addition, the CrossFire™ is also compatible with 220V power in other countries. Please consult the User Guide for instructions on how to configure the power supply for 220V input. International customers may need to purchase a plug conversion for the US input plug that is supplied with the machine.
-
The X-axis torch carriage is powered by a 280 oz-in stepper motor and the Y-axis gantry carriage is powered by a 420 oz-in stepper motor.
-
Both stepper motors utilize 32X micro-stepping for ultra-smooth table motion and peak torque delivery at higher travel speeds.
-
Yes. The electronics package on the CrossFire™ CNC plasma table was designed to be completely plug and play. Simply plug in the two stepper motors, USB connection, torch ON/OFF wiring, and input power to the enclosure and it is ready to operate.
-
Yes. This quiet humming from the motors indicates that they are correctly receiving power from the stepper motor drivers and it is completely normal during motor idling.
-
Yes. The power supply inside the electronics enclosure is a switch mode power supply and is capable of accepting either 120V or 220V power. Each machine ships configured for 120V power and US customers will not need to change any settings inside the enclosure. For international customers that are operating at 220V power, you will need to open up the electronics enclosure and flip the toggle switch on the side of the power supply to 220V. Failure to do so will damage the power supply inside your electronics enclosure and it will need to be replaced. Please consult the User Guide for how to open up the electronics enclosure and configure the power supply for 220V input.
-
All electronics parts on the CrossFire™ machine are available for purchase in the event of accidental damage or wear. Please contact Langmuir Systems directly for pricing information and order placement.
-
No. The CrossFire™ machine was designed to be a true open loop hobby machine and it does not include end-stop limit switches. This product is not a 'lights-out' industrial machine and it will require that the operator is present during cutting to monitor any potential crashes that may result from incorrect programming or setup.
-
The power supply inside the electronics enclosure is a 36V 10A switch mode power supply.
-
No, the electronics enclosure is not water-proof. We understand that many users will be using a water table when cutting with their CrossFire ™ machine and it is important that water is kept away from the electronics enclosure at all times. Failure to do so may result in permanent electronics failure.
-
Yes. Each CrossFire™ plasma machine ships standard with all necessary cables and wires including a 3 prong power input cable, two stepper motor cables, 5ft USB cable, and two wires for Torch ON/OFF setup. International customers may need to purchase a plug conversion for the US input plug that is supplied with the machine.
-
No. The cutting envelope on the machine is only 25.3" x 23.3" and we have determined that this is too small to require an automatic torch height control (ATHC) unit. In addition, it will be required that the operator is present when the machine is cutting so that if the torch is at risk of contacting the material, the program can be paused and the torch height can be manually readjusted.
-
Each CrossFire™ machine includes a 2.5ft tall cable routing pole. This pole is provided so that the cable from the plasma cutting torch does not interfere with the movement of the torch when cutting. Simply run your torch cable up the pole and use the Velcro straps that were provided to secure the cable in place. We recommend that you leave enough slack in the cable so that the torch can freely move around the entire table surface without binding.
-
Not all plasma cutter styles are compatible with the CrossFire™ CNC plasma table. If your machine uses a scratch start or high frequency (HF) start it is not compatible with the plasma table. We have assembled a list of plasma cutters that are compatible with the CrossFire™ CNC plasma table and they can be found at the top of this FAQ.
-
A plasma cutter is a fairly self-contained machine and includes three main parts; the power source, the cutting torch, and a ground clamp. The power source is the main body of the machine and generates the necessary power for plasma cutting. The plasma torch connects to the power source and is used to do the cutting on a given piece of material. The ground clamp is necessary to complete the circuit between the conductive work piece and the arc that is transferred from the plasma torch to the work piece. The ground clamp needs to be connected to either the work piece or the slat bed when cutting.
-
A typical shop air compressor is required to operate any plasma cutter. You will need to consult your plasma cutter manufacturer for the specific air requirements for your machine which typically are rated in CFM (cubic ft/min) at a given PSI (pounds per square inch). For many low powered plasma cutters, a small inexpensive air compressor is all that is required.
-
No. Many plasma cutters give the option to run at either 120V or 220V power which can be convenient if a 220V circuit is not readily available in your workspace. For operating at 120V, the plasma cutter will have less cutting ability and will be rated for a given cut thickness. The RAZORWELD Vipercut30i that is available for purchase with the CrossFire™ machine is capable of running on either 120V or 220V input. Given the low input voltage at 120V, we do not recommend using this setting when cutting on the CrossFire™ machine because the torch needs to be prohibitively close to the material in order to transfer the arc.
-
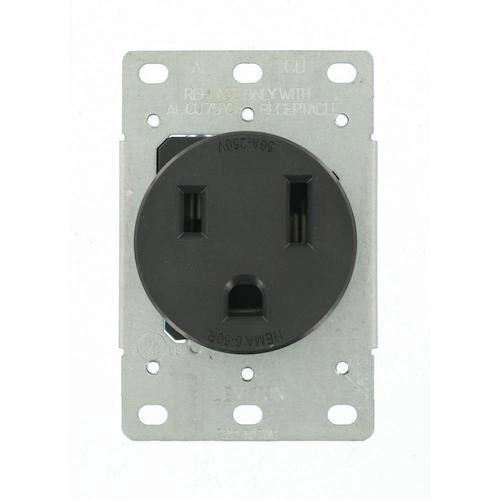
The Razorweld Razorcut 45 and the Vipercut 30i come with a 50A 220V 3 prong male plug. The plug will fit the outlet shown below.
![]()
-
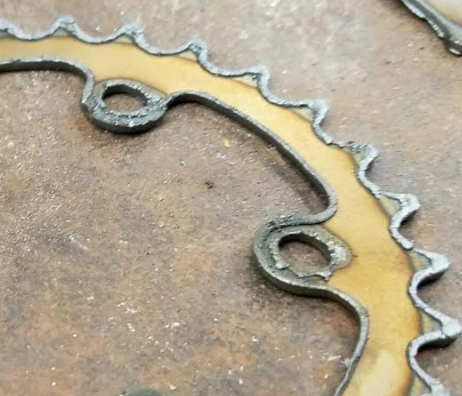
Dross is an unwanted intermetallic byproduct that is produced on the backside of a part when plasma cutting. Dross occurs when molten metal and impurities rapidly solidify on the base material during cutting. Fortunately, dross is a very brittle substance and can easily be chipped away from a finished work piece to reveal a nice clean cut edge. The picture below is an example of dross that has formed on the backside of a part during cutting.
![]()
-
Several methods can be used to remove the dross from the backside of parts and this will depend on the amount of dross present. For most parts, all that is required to remove the dross is a hand chisel that can be pushed against the dross edge to chip the unwanted material away. If the dross is still sticking in some areas, a hammer may be required to provide enough force to remove the dross. We recommend clamping the workpiece to a table when using a hammer and chisel to remove backside dross. For thicker dross on more intricate parts such as detailed artwork, power tools can be used to quickly remove the dross with minimal effort. We have found that using a knotted wire wheel on an angle grinder is a great method for removing dross quickly. If dross remains on areas of material that are very delicate, it may be necessary to use a sander to completely remove the dross without deflecting the base material. Always use proper eye protection when removing dross from parts.
-
While dross is a normal aspect of plasma cutting, the tips highlighted below can be used to reduce the incidence of backside dross when cutting.
- Cut Speed: Backside dross can occur when cutting if the travel speed used is too slow. Try increasing your travel speed by 5 IPM increments until the amount of dross is reduced.
- Cut Height: If the cut height is too low, this can cause more dross to form. Try increasing the cut height in 0.030" increments until the back side dross is reduced.
- Amperage: If the cutting amperage is too high, this can cause an increase in the amount of backside dross. Try reducing the cutting amps in increments of 3A until the amount of dross is reduced.
- Nozzle Size: A larger nozzle orifice can result in an increased presence of backside dross. Consult your plasma cutter manufacturer for the availability of smaller nozzle sizes that are compatible with your cutting torch.
-
Top spatter or top dross can occur when the plasma stream first pierces the work piece and the molten metal adheres to the top surface of the material. It is typically much less common than back side dross and it can be easily removed by chipping away from the work piece. If you are experiencing a high incidence of top dross, it is possible that your chosen cut height is too high and should be reduced.
-
Edge bevel or edge angularity refers to the angle of the cut surface. In a perfect world, the cut edge angularity would be zero and the cut angle would be a perfect 90 degrees to the plate surface. In reality, the plasma cutting process can produce a slight edge bevel due to the shape of the plasma gas jet as it escapes the torch nozzle. Typical edge angularity on a good part is around 2-3 degrees which can be difficult to detect with the naked eye. Some factors that can cause an increased edge angularity include fast travel speeds, a worn nozzle, incorrect amperage, and improper cutting height.
-
No! Only plasma cutters with blow-back start torches are compatible with the CrossFire™ CNC plasma machine. Plasma machines that operate using High Freqency (HF) start torches are not permitted for use with the CrossFire™machine. The use of these style of plasma cutters can interfere with the sensitive electronics inside the machine enclosure which can result in erratic motor steps and permanent electronics failure. The use of these style of plasma cutters with your CrossFire™ machine will effectively void your warranty. Please contact your plasma cutter manufacture if you are unsure about what style of plasma torch is included with your plasma cutter. For a complete list of Langmuir Systems approved plasma cutters, please see the top of this FAQ.
-
If you are not achieving enough penetration to completely sever the material when cutting, you will need to either increase the cutting amperage or decrease the travel speed (or both). We recommend first reducing the cut speed by 10 IPM increments until a nice clean cut edge is achieved. If the plasma cutter is still unable to cut completely through the material, you may need to increase the cutting amperage on your machine. If neither of these methods solves the problem, you may need to replace your cutting consumables or find a more powerful plasma cutter for your given project.
-
Plasma cutting is a fairly industrial process and personal protective equipment (PPE) should be worn at all times when operating the machine and a plasma cutter. Closed toes shoes, pants, eye protection, and a long sleeve shirt should be worn at all times when operating the machinery. The plasma cutting process creates hot molten sparks that can be ejected from the work piece and land on the user when standing too close. In addition, eye protection must be worn at all times when operating the machine. The plasma arc, like any electric arc, gives off a huge spectrum of electromagnetic radiation that can cause permanent eye damage if looked at directly. We recommend using OSHA/ANSI approved safety glasses with a shade 5 or better protection rating. These safety glasses will be able to be purchased directly from Langmuir Systems at our online store.
-
Plasma cutting can be a fairly loud process due to the forced air stream that is used to cut through the material. In addition, if you have a low capacity air compressor, it's possible that this will be running during cutting to keep up with demand which can add another source of noise. Cutting with a water table can greatly reduce the noise due to plasma cutting. When cutting indoors we recommend wearing ear protection when operating the machine.
-
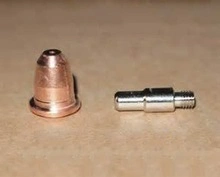
The two main consumables of a blow-back start plasma torch are the electrode and the nozzle (see picture below). If all cutting parameters are set correctly, it is possible to get several hundred starts (pierces) out of a single consumable set which can translate to several thousand feet of cutting!
![Description: Image result for s45 nozzle electrode]()
Nozzle & Electrode Set for Trafimet S45 Torch
-
It is important to make sure that all cutting parameters are set correctly in order to extend the lifetime of plasma cutting consumables. Below is a list of best practices that can greatly increase the lifetime of your plasma cutting consumables.
- Keep your Consumables Clean: The daily buildup of dirt and grime on the nozzle can clog the orifice which greatly affects the swirling of the plasma arc. This can lead to decreased lifetime for both the nozzle and electrode.
- Use the Correct Air Pressure: If air pressure is too high, this can greatly reduce the lifetime of the electrode. Conversely, if air pressure is too low the nozzle orifice will wear which can affect cut quality. Consult your plasma cutter manufacturer for ideal air pressure settings for your specific plasma cutter model.
- Use the Proper Cut Height: When the plasma cutter initiates the arc, it can take several moments to completely pierce the material depending on the thickness of the material. During this pierce, molten metal is ejected from the topside of the material which can be blown back onto the nozzle orifice. As a result, it is important to use a cut height that is not too low to avoid this blow back of material which can damage the nozzle orifice. Conversely, if the cut height is too high the arc will not transfer which will degrade the lifetime of the electrode. Consult your plasma cutter manufacturer for the correct cutting height parameters for your given project.
- Always use Dry Air: The plasma cutting arc is especially sensitive to moisture. Air compressors take humidified air from the atmosphere which always contains some amount of water. Make sure that you either have a water separator on your plasma cutter or that you have a water separator in line with your air compressor before the air is delivered to your plasma cutter. Moisturized air can greatly decrease the lifetime of your consumables and can negatively affect cut quality.
- Use Proper Cut Parameters: Every plasma cutter is different. We encourage you to contact your plasma cutter manufacturer to get a complete list of proper cutting parameters to use with your machine to optimize the lifetime of your consumables.
-
Consumable costs will vary depending on your plasma cutter manufacturer but in general they are very affordable. For example, a nozzle and electrode for a Trafimet S45 torch used on many style of plasma cutters costs approximately $4 for each component. Typically, one set of consumables will last for several hundred parts worth of cuts if all the parameters are dialed in properly.
-
We recommend a few options for sourcing material to cut on your CrossFire™ CNC plasma table. For purchasing sheet metal and plate, we recommend contacting your local metal supply house for a complete selection of shapes and sizes. For sourcing specialty material or smaller sizes, there are many great options for purchasing raw material online. In addition, many local recycling houses or scrap yards will have a large variety of cheap used metal that can be repurposed for your home projects.
-
All plasma cutting manufacturers should publish cutting parameters for your specific machine. This should include values such as amperage, air pressure, cut height, and travel speed. If you do not have access to these values for your specific machine, we recommend viewing our cut charts for the RAZORWELD machines to get a good starting point. It is always a good idea to make some initial test cuts in order to assess the cut quality before cutting out a complete part.
-
We do not recommend attempting to drill or thread any holes that have been plasma cut. The reason for this is that the plasma cutting process produces a hardened edge at the cut location which can quickly dull your drill bits or taps. If you need to create a tapped hole feature on your parts, we recommend using a drill press and hand tap set to create these features.
-
The disposal of used plasma water can be considered hazardous material in certain areas. We encourage you to contact your local environmental agency for specific regulatory information for your region.
-
No! The plasma cutting process utilizes an incredibly high temperature plasma stream to effectively melt the metal workpiece when cutting. As a result, parts are extremely hot after cutting. It is recommend that parts are first dunked into water after cutting or waiting for the parts to completely cool down before handling.
-
Given the controlled nature of CNC plasma cutting, we have found that torch consumables last significantly longer when used on the machine when compared to the lifetime of consumables during manual hand cutting off the machine. As a result, we recommend that you save your worn out consumables that were used on the CrossFire™ machine and use these for manual hand cutting.
-
Duty Cycle is generally expressed as a percentage and represents the ratio of 'on' time versus 'off' time that is allowed when a machine is running. It is easiest to think of the practicality of duty cycle in 10 minute intervals. For example, a plasma cutter with a duty cycle rating of 60% at 40 Amps indicates that the plasma cutter can be operated continuously for 6 minutes at 40 Amps but will need to remain off for 4 minutes in order to cool down for further usage. If you were to use this plasma cutter and are cutting a part that takes longer than 6 minutes of continuous cutting (very unlikely on the CrossFire™ machine), then it would be required to pause the program after 6 minutes of cutting and restart after a cool down period of 4 minutes. If you are cutting at an amperage that is less than the rated duty cycle, then the permitted cutting time is increased accordingly.
-
Yes. Dry input air is required when plasma cutting and most plasma cutters will have a water separator included on the unit (please check with your plasma cutter manufacturer). Sometimes, this water separator is located inside the plasma machine cabinet and the cabinet will need to be opened up in order to periodically drain the water in the container (please consult your plasma cutter manufacturer for specific instructions). If dry air is not used, the cut quality can be seriously affected. If a water separator is not included with your machine, you can purchase one at any industrial supply store. The two RAZORWELD plasma cutters that are offered by Langmuir Systems have water separators located inside the machine cabinet.
-
Arc mis-firing can be the result of several issues. The most common is that the electrode is starting to wear and needs to be replaced. If you are getting intermittent arc mis-firing, then the electrode is the likely culprit. If after replacing the electrode the arc is still mis-firing, then it could be a problem with your plasma cutter or the torch firing system itself. Remove the plasma hand torch from the CrossFire™ machine and try to make a test cut manually with the hand torch. If the torch still does not fire, this indicates an issue with your plasma cutter and you will need to contact your manufacture to troubleshoot this issue. If the arc starts by using the hand torch but does not fire on the machine, it is possible that the arc starting relay inside the CrossFire ™ electronics box is not functioning properly. If this is the case, please contact Langmuir Systems to submit a service request.
-
Most plasma cutters will be rated for both cut thickness and severance cut thickness. Cut thickness is the maximum rated thickness that a plasma cutter can pierce over the material and still make a clean cut through the full thickness. The severance cut thickness is the thickness that a plasma cutter can cut but requires an edge start in order to properly pierce the material completely. If you need to make a cut on the CrossFireTM machine that is within the severance cut range of your plasma cutter, we recommend setting up your material so that the plasma cutter makes an edge start before cutting. For interior holes and cut-outs, it may be necessary to pre-drill these locations first in order to make a proper edge start inside the plate.
-
The CrossFire™ machine uses Mach3 software in order to control the motion of the machine. This includes jogging, setting offsets, running programs, and torch automatic firing.
-
The Mach3 software requires a computer running any version of Windows XP/Vista/7/8/10. In addition, your computer needs a free and available USB port in order to connect to the CrossFire™ machine electronics.
-
Please visit our Downloads for a complete list of plugins and configuration files required to run Mach3 with your CrossFire ™ machine.
-
Yes, however, you will still need to configure your software with the CrossFire™ configuration file which is available in our Downloads.
-
No! While Mach3 does include an MDI interface for single line code input, it is not necessary to have a knowledge of G-code in order to operate the CrossFire™ CNC plasma table. Autodesk Fusion 360 software exports your toolpath programming as a .TAP G-code file which can be read by the Mach3 controller to execute part cutting.
-
There are two ways to jog the machine. The easiest way is to use the keyboard arrow keys on your computer. Pressing the 'up' or 'down' keyboard arrows jogs the machine up and down along the Y-axis. Using the 'left' and
'right' arrow keys jogs the machine left and right along the X-axis.
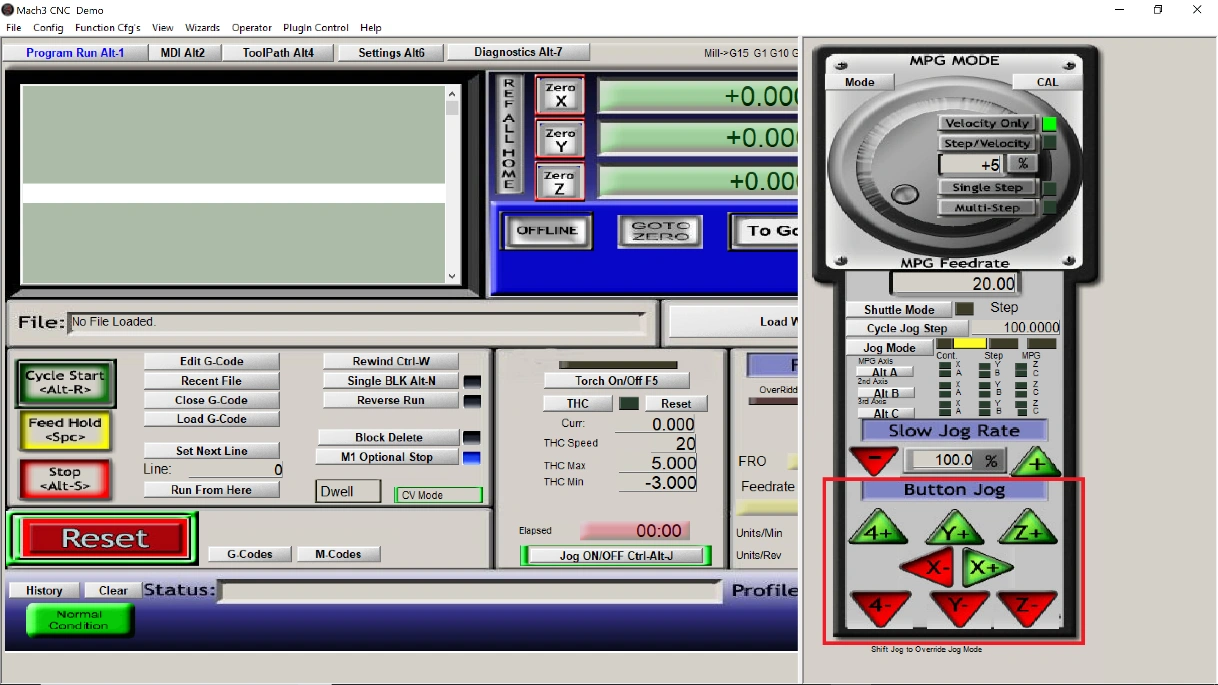
The second way to jog is by pressing the TAB button on your keyboard to reveal the JOG pendant in Mach3. The machine can then be jogged by using the Button Jog section (highlighted in red in the image below).
![]() |
|
-
We recommend performing a dry run of your program before actual cutting in order to double check that the programming and part setup were performed correctly. To perform a dry run, simply turn your plasma cutter off and run the program as normal by pressing 'Cycle Start'.
-
The CrossFire™ machine uses a Cartesian coordinate system with the origin (0,0) position being located in the bottom left corner of the machine. Please see the image below for a diagram of the axes configuration on the machine.
-
Sometimes it is necessary to be able to fine jog the machine when setting up for a desired cut. To access the fine jog menu, press TAB to reveal the jog pendant menu in Mach3. Click the 'Cycle Jog Step' button in order to toggle the required jog distance. For example, if the jog distance is selected as 0.010 then the machine will incrementally jog by 0.010" when an arrow key is pressed and this will allow for very fine movement of the machine. Next, press the 'Jog Mode' button so that the yellow bar indicates that the 'Step' mode is activated.
In order to return to regular jog mode, press the 'Jog Mode' button so that the yellow bar indicates that 'Cont.' mode is selected.
-
Yes. A program can be paused in the middle of a running program by clicking 'Feed Hold' or by pressing the spacebar. A program can only be paused when the torch is OFF, such as during a rapid movement between cuts.
-
Yes. If a program was paused during cutting, it can be restarted by clicking 'Cycle Start'. In addition, a program can be run from a certain line of code by selected the line of code and clicking 'Run From here'.
-
Once your plasma cutter is hooked up to the CrossFire™ electronics unit, the plasma cutter can be automatically fired in the Mach3 control interface. One way to fire the torch manually is by pressing the 'Torch On/Off F5' button located on the Mach3 control panel. Another way to toggle the torch On and Off is by pressing F5 on the keyboard.
-
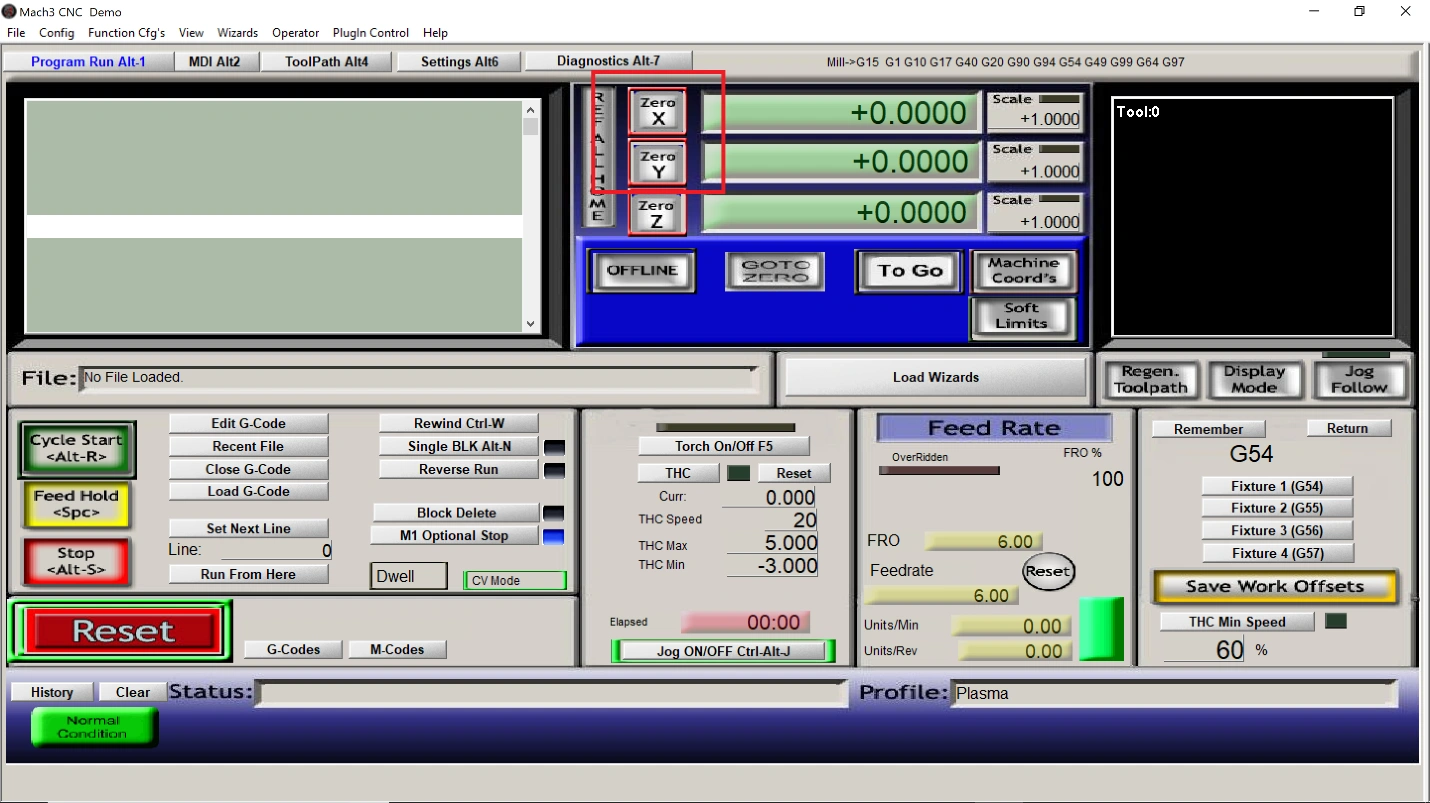
After loading a program, the CrossFire™ machine needs to be jogged so that the torch is located at the program origin relative to the material location on the machine. Once the origin has been set, it is necessary to zero out both X and Y axis in Mach3 before cutting. This can be accomplished by pressing the 'Zero X' and 'Zero Y' buttons respectively. Please see the figure below for the location of these buttons.
![]()
-
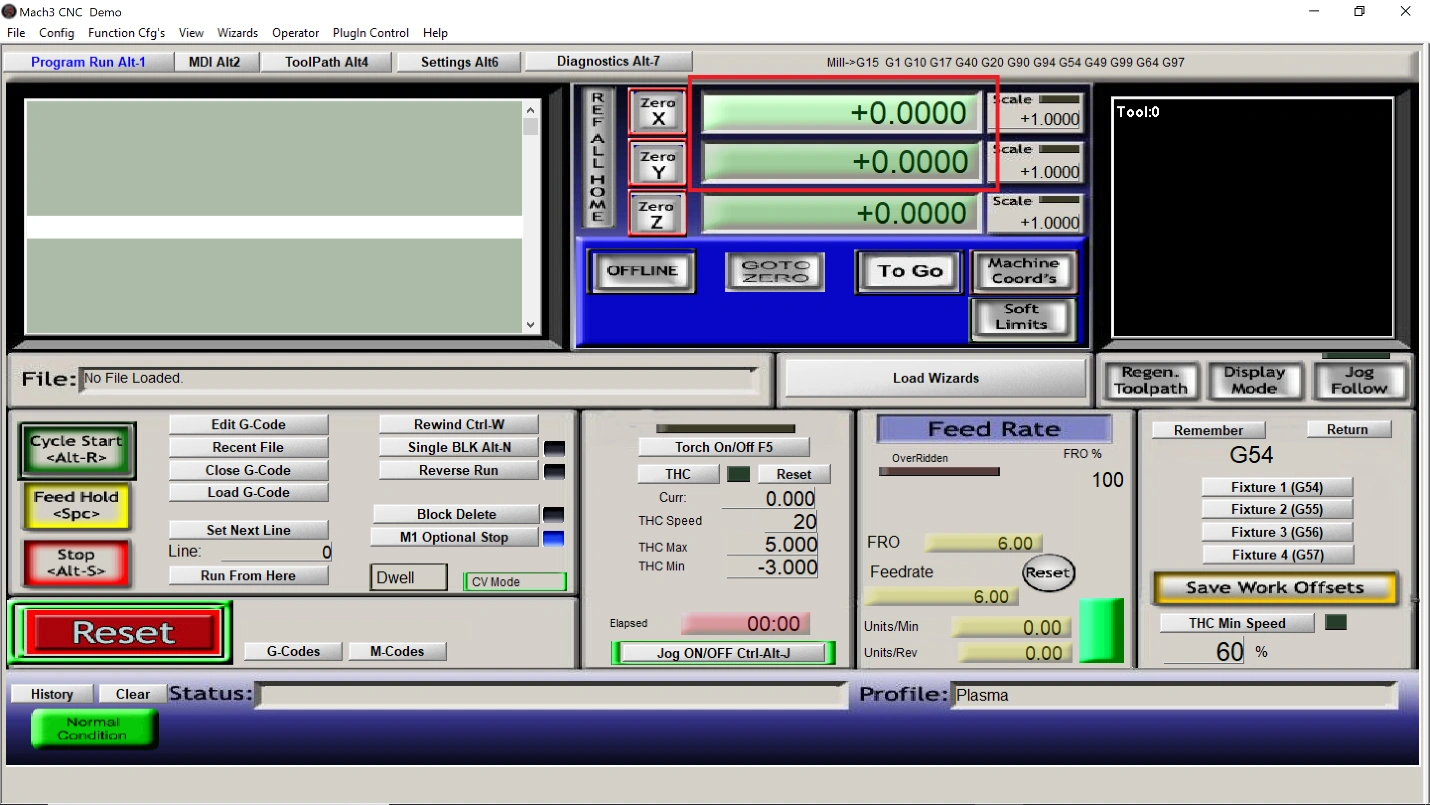
Yes. Sometimes it may be necessary to start a program at a location that is not the origin. For example, if you are indexing a large sheet of material through the CrossFire™, it may be necessary to start a program at a specific coordinate location. Simply click the numerical position box for a given axis until the box turns to a different shade. Next, type in the desired coordinate location and press enter.
![]()
-
The Mach3 controller will run a program relative to the machine's current position. If you forget to zero your axes before running a program, the program will run from the coordinate system that was previously set on the machine. This could cause your program to be cut in the wrong location and even worse could cause the machine to make a movement outside of its available travel limits which will result in a crash. We highly recommend performing a 'dry run' with the plasma cutter off before cutting a part to ensure that everything was programmed and zero-ed out correctly.


 |
|
