MR-1 Assembly Guide
Safety
When used correctly, the Langmuir Systems MR-1 CNC Gantry Mill will offer you years of safe operation. However, like all other automated and industrial type machinery, there are important safety considerations and precautions that must be followed in order to avoid injury. Study these safety warnings carefully before assembling and using your machine.

ELECTRIC SHOCK
Electric shock can cause serious injury or death. Cables, points, and connections in the Electronics Enclsoure contain high voltages. To avoid injury, adhere to the follow precautions:
- Never touch bare wires/buses/connections or components that are carrying electricity.
- Even after the machine is powered off, the electronics enclosure may retain dangerous electrical voltages.
- Repair or replace all worn or damaged components. Turn off power to machine and spindle when making repairs.
- Install and maintain equipment in accordance with the National Electric Code (NEC)
- If you have limited electrical knowledge/experience, hire a certified electrician to perform all electrical work.

FIRE AND EXPLOSION
The MR-1 and its enclosure are not designed to protect or contain explosions or fires. Electrical fires can be caused if the machine is assembled or used incorrectly. To avoid injury, always adhere to the following precautions:
- Never operate the machine in the vicinity of flammable materials or where there is volatile and combustible fumes in the air.
- Do not use the machine to mill materials or parts that are not intended for that specific machining purpose.
- Always keep a fire extinguisher nearby in case of emergency.
- Never operate the machine in a poorly ventilated area.
- Be sure to read and understand all MSDS safety data for any materials, coolants, or lubricants used in operating the MR-1.

AUTOMATIC OPERATION
The machine may operate at any time, automatically, and without warning. To avoid injury, always adhere to the following precautions:
- Acquire sufficient training before operating the machine.
- Do not operating the MR-1 wearing loose fitting clothing, jewelery, or other potential entanglement hazards.
- Never place any part of your body in direct contact with areas of the machine that can pinch and crush when powered on. Assume that if the machine is powered, it may move at any time.
- Keep area clear of bystanders, make sure that no one but the person operating the machine has access to the computer controls.

CHIPS & EJECTION
Milling creates chips and other airborne debris that can cause eye injuries. As well, fixtures, tooling, workpieces, or other items can become projectiles during the milling process. To avoid injury, always wear appropriate PPE and adhere to the following precautions:
- Always wear suitable eye protection when operating the machine even when operating with the Enclosure closed. Eye protection should follow the guidelines established in ANSI Z87.1.
- Ensure that all bystanders in the immediate vicinity are wearing suitable eye protection.
- Verify you have appropriately secured all components before operating the machine.

PINCH AND CRUSH POINTS
This machine can create pinch points while in motion during normal operations. To avoid injury, always adhere to the following precautions:
- Do not touch any part of the machine when it is moving under power.
- Be aware of all areas of the machine that could potentially be a pinching hazard, such as bearings, ball screws, ball nuts, and slides.
- Never make repairs to the machine when the machine is powered on.
- Remove loose-fitting clothing, neckties, gloves, and jewelry as well as tying up or otherwise securing long hair.

HOT SPINDLE
The milling process uses high speed spindles with attached tooling to machine metal. As a result, both the spindle and stock material can be very hot after cutting which can cause burns. To avoid injury, always adhere to the following precautions:
- Always assume that the spindle is hot enough to cause severe burns.
- Always allow spindle and potentially hot material to sufficiently cool before handling.

CUT HAZARD
The milling process uses sharp tooling and produces sharp swarf/chips. To avoid injury, always adhere to the following precautions:
- Verify all machine motion is completely stopped before handling or changing tooling.
- Exercise caution in handling any tooling or clearing chips.

NOISE EXPOSURE
The machine and milling process can produce noise that can exceed safe exposure limits. Sound emission levels vary depending on machining processes so be sure to adhere to the following precautions:
- Wear ear protection when operating the MR-1, especially during milling procedures.
- Be conscious of the characterstics of the work room and other sources that may have affect of sound pressure levels.
Getting Started
Assemble Your MR-1
Use the following MR-1 Assembly Guide to put together your machine.
Set up your MC4000 Control Computer (if purchased)
View the Control Computer Setup section of this guide and follow along to set up your Mini-PC.
Install CutControl
Download and install CutContol, the software used to control your MR-1.
Run the Spindle Break-in Program
Download the MR-1 Break-in program from our Downloads page and run it using CutControl.
Make your First Part
Use the MR-1 Cutting Parameters to program and cut your first part on MR-1.
MR-1 CNC Mill Assembly
The Langmuir Systems MR-1 ships partially assembled. Therefore, this section serves to provide all of the pertinent information and instructions needed to fully assemble your new machine.
0: Uncrating
Your MR-1 is delivered in a single crate that includes the Base MR-1 Machine and all add-ons and accessories ordered at the time of purchase. An in-depth description of what is packed in the crate for the Base Machine is provided here. All Sub Boxes, Assemblies, and hardware is clearly labeled and verified before shipment. Please use this as a reference for the rest of the assembly.
MR-1 Crate (48" x 48" x ~30")
- (1) CHIP TRAY
- (4) MACHINE LEG
- (1) X/Z ASSEMBLY SUB BOX
- (1) Y AXIS RAILS SUB BOX
- (1) X AXIS RAIL SUB BOX
- (2) Y AXIS CARRIAGE SUB BOX
- (1) LINEAR RAIL AND BALL SCREW BOX
- (1) ELECTRONICS ENCLOSURE SUB BOX
- (1) Y AXIS RAIL REINFORCING PLATE BUNDLE
- (2) BASEPLATE HALF
- (1) Y AXIS RAIL MOUNTS SUB BOX
- (1) STEPPER MOTOR SUB BOX
- (2) BASEPLATE POSITIONER
- (1) CABLE SUPPORT TUBE
- (1) TEMPORARY TRAY SUPPORT
- (1) HARDWARE SUB BOX
- (1) MISCELLANEOUS PARTS SUB BOX
- (1) CABLES SUB BOX
- (1) COPLANARITY CHECK GAUGE
- (1) SHIM BOX
- (1) WELCOME BOOKLET & MACHINE DECALS
- (*) ALL ADDITIONAL ACCESSORIES
1: Install Legs & Concrete Prep
The first step in MR-1 assembly is attaching the legs to the chip tray. Next, you'll be preparing the machine base for concrete.
- (1) Chip Tray
- (4) Leg
- (16) BAG 1 SOCKET HEAD CAP SCREW, 1/4-20 X 5/8
- (16) BAG 23 SERRATED FLANGED NUT, 1/4-20
- (16) BAG 27 WASHER, 1/4-20
- 3/16” Hex Key
- 7/16” Wrench

Instructions
- Identify a suitable location to assemble AND OPERATE the machine. If relocation of the machine after concrete pouring is not avoidable, it is strongly advisable to allow the concrete to cure for at least two weeks before moving with a forklift. If the machine will be relocated after assembly, the leveling feet kit is required to ensure that all 4 legs are equally loaded in the new location.
- Secure the Legs to the Chip Tray using the BAG 1, BAG 23, and BAG 27 fasteners shown. Note that all four legs are identical and their orientation is not important.
- Ensure that all four legs are in contact with the ground. If one leg is off the ground, manually ‘twist’ the chip tray until all four legs are in contact with the ground.
- (4) Leveling Foot Mount (1 per Leg)
- (4) Swivel Leveling Foot (1 per Leg)
- (4) PRE-INSTALLED - 3/8-16 JAM NUT
- (8) BAG 1-FEET BUTTON HEAD CAP SCREW, 5/16-18 X 1"
- 3/16” Hex Key
- 9/16” Wrench
- 5/8” Wrench

Instructions
- Remove the pre-installed jam nut from the leveling foot and set aside.
- Screw the leveling foot into the leveling foot mount as far as the threads will allow
- Attach the leveling foot mount to the leg using the BAG 1-FEET fasteners shown.
- Reinstall the jam nut, but do not tighten. At this point the leveling feet will not be touching the ground.
- Repeat steps 1-4 on the remaining three legs.
- MR-1 Base (As Assembled)
- None
- Bubble Level
- Shim Stock (Not Provided)

Instructions
- The goal of this step is to ensure the each edge of the chip tray is level to the ground. This step is important for proper flow of both the concrete and later the epoxy surfacing kit (if purchased).
- Use a bubble level to check each edge of the chip tray. If leveling feet were previously installed, adjust them until all edges are level. Make sure to tighten the jam nuts on the leveling feet after adjustments are completed.
- If leveling feet were not purchased, using shimming material between the ground and the legs to achieve proper level.
- MR-1 Base (As Assembled)
- None
- Duct Tape

Instructions
If you are not installing either the Flood Coolant Kit or Drain Kit, use two or three layers of duct tape to seal the holes circled in red. Apply the duct tape on the inside of the chip tray.
- (2) Mesh Screen (1 per side)
- (2) Side Drain (1 per side)
- (2) M 32 x 1.5 Flange Nuts
- N/A
- M 32 Wrench or Crescent Wrench

Instructions
- Place the two Side Drains into the two holes in the Chip Tray, such that the threaded ends stick out of the bottom of the Chip Tray.
- Thread the M32 flange nuts on to the threaded end of the Side Drains by hand until hand tight.
- Rotate the Side Drains until they are oriented as shown in the image above.
- With a M32 wrench or crescent wrench, tighten the M32 flange nuts till the Side Drains are secured in this orientation.
- Place one Mesh Screen into the pocket of each Side Drain.
2: Internal Structure
Next, assemble the internal structure of the MR-1.
- (1) Assembled Machine Base (FROM PREVIOUS STEP)
- (2) Y-Axis Rail
- (1) Rear Y-Axis Rail Mount
- (1) Front Y-Axis Rail Mount
- (8) BAG 5 SOCKET HEAD CAP SCREW, ¼-20 X 1"
- 3/16" Hex Key
- Tape Measure


Instructions
- Carefully review the graphics to develop an understanding of the orientation of Front Y-Axis Rail Mount, Rear Y-Axis Rail Mount, and the Y-Axis Rails. These need to be positioned exactly as shown in the graphic with respect to the front of the machine.
- Attach the Y-Axis Rails to the Front and Rear Rail Mounts using the fasteners shown. Snug the screws but do not tighten them yet. Make sure that the machined mating surfaces on the bottom of the Y Axis Rails have intimate contact to the mating surfaces on the Front and Rear Rail Mounts and that there are no gaps. You may need to flex or manipulate the Y-Axis Rail Mounts when attaching the Y-Axis Rails to ensure that the male and female keyways have intimate contact.
- Shift the Y-Axis Rails side to side until the BAG 5 screw heads are roughly centered in the slots. Tighten the screws.
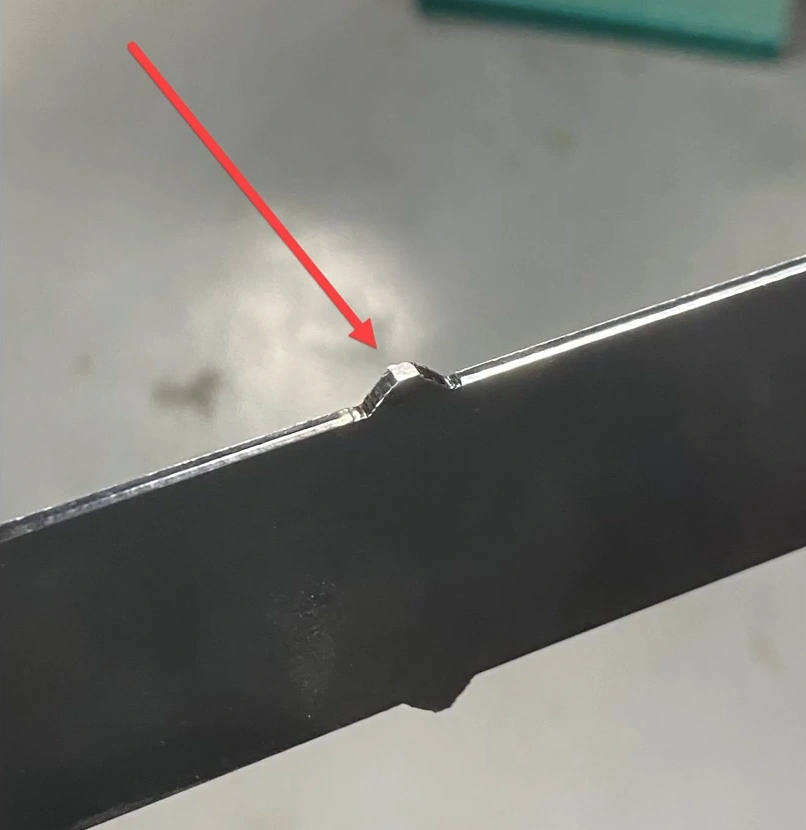
- If you are not achieving intimate contact between your rails and mounting pads as specified in step A2 (for example if you are seeing light between these mating surfaces indicating a small gap), please watch the following troubleshooting video to correct any issues with the assembly.

Instructions
- If not already done, slightly loosen the 8 screws that secure the Y-Axis Rails.
- Using a tape measure, measure the distance between the long slots on top of the Y Axis Rails. As shown in RED in the above graphic, this is measured as the distance between the inside (nearest) edges of the slots on both Y Axis Rails. Shift the Righthand Y-Axis Rail as needed to achieve a distance of 34.0” as measured at both the front and the back.
- Using a tape measure, shift the assembly until the diagonal distances shown above in GREEN are equal. The diagonals should be measured at the opposing corners of the Y-Axis Rails as shown.
- Re-check the 34.0” distances and adjust as needed. NOTE: Do not loosen the 8 screws to perform the minor adjustments needed. The Rail Mount tie bars have enough compliance to correct any diagonal measurement error that may exist.
- Tighten the 8 screws that secure the Y Axis Rails to the uprights.
- Shift the assembly in the Chip Tray until the front faces of the Front Y-Axis Rail Mount tubes are 8.25" from the front edge of the chip tray.
- Center the assembly inside the chip tray by taking measurements as shown in BLUE from the edge of the chip tray to the side of the assembly and making sure that it is equal distance on both sides at various locations.
- Double check the diagonal measurements and make adjustments as necessary. NOTE: Do not loosen the 8 screws to perform the minor adjustments needed. The Rail Mount tie bars have enough compliance to correct any diagonal measurement error that may exist.
Instructions
-
Follow Video Instruction to use the Coplanarity Check Gauge to determine the number and placement of shims
required to acheive complarity between Y-Axis Rails.
It’s well understood that concrete cure distortion will create coplanarity error. The reason that this must be done before in addition to after pouring is because the baseplate is located off of the Y-Axis rails with the baseplate positioner. If coplanarity error exists, it will compromise the alignment of the baseplate and require excessive and unnecessary stock removal to achieve full cleanup of the baseplate working surface. -
If your Coplanarity Check Gauge does not have a smooth surface for the indicator
tip to reference against, we recommend using a file to create a flat surface as shown below.
![]()
- Set Aside the Coplanarity Check Gauge and any unused Shims. Both will be used again after the concrete cure for final adjustment of Y-Axis coplanarity.
- (4) Y-Axis Rail Stiffener
- (2) Baseplate Positioner
- (24) BAG 6 BUTTON HEAD CAP SCREW, ¼-20 X 3/8"
- 5/32" Hex Key

Instructions
- The purpose of this step is to check fit the Baseplate Positioners and the Y-Axis Rail Stiffeners prior to pouring the concrete. If there are any issues or defects with these parts, it must be determined prior to starting the concrete pour.
- Temporarily install the four Y Axis Rail Stiffeners using the fasteners shown. The goal is to verify that the holes line up and that the screws thread into the Y Axis Rails properly. Clean/chase any threads that seem tight.
- Place the Baseplate Positioners onto the Y Axis Rails in the approximate locations shown. Make sure that the locating tabs at each end fit into the slots and rest firmly on the floor of the slots. If they do not, Adjust the RH Y Axis Rail inward or outward until proper fit is achieved.
- Remove the Baseplate Positioners, Y Axis Rail Stiffeners, and associated fasteners and set aside until the concrete pouring steps.
- (2) Baseplate Half
- (2) Baseplate Positioner
- (52) BAG 1 SOCKET HEAD CAP SCREW, ¼-20 X 5/8"
- (8) BAG 6 BUTTON HEAD CAP SCREW, ¼-20 X 3/8"
- (52) BAG 7 COUPLING NUT, ¼-20
- (52) BAG 8 HEX HEAD CAP SCREW, ¼-20 X 1.5"
- 3/16" Hex Key
- 5/32" Hex Key
- 3/8" Wrench
- 7/16" Wrench
- Calipers or Scale

Instructions
- In each of the 52 counterbored holes (26 per baseplate) insert a BAG 1 socket head cap screw and retain it using a BAG 7 coupling nut. Fully tighten each coupling nut.
- Into the other end of each coupling nut, install one BAG 8 hex head cap screw. Tighten fully.
- Set the baseplates side by side with no gap between them. Using calipers or a scale, measure the center-to-center distance between the threaded fixture holes shown in RED. When oriented properly, the center-to-center distance will be nominally 2.0”. If one or both baseplates are oriented incorrectly, the distance will be slightly larger than 2.0”.
- Note: It is critical to have the baseplate orientation correct before installing the baseplate positioners. Failure to do so will prevent the use certain fixtures that rely on an exact 2.0” spacing of the fixture holes.
- Attach the baseplate positioners to the baseplates using the BAG 6 fasteners shown. Before tightening the screws, make sure that the front edges of the baseplates are aligned to each other, and also make sure that there is no gap between the two baseplates by pushing them together when tightening the fasteners. Slight unevenness between the levels of the baseplates at the seam is normal; these are raw extrusions and the baseplates will be decked off once the machine assembly is completed.
- Set aside this assembly as it will be used in a later step during the concrete pour.
- (1) Cable Support Tube
- (1) BAG 3 U-BOLT
- (2) BAG 3 WASHER, ¼"
- (2) BAG 3 HEX NUT, ¼-20
- 7/16" Wrench

Instructions
- Secure the Cable Support Tube to the inside face of Rear Y-Axis Rail Mount using the U-bolt hardware as shown. Align/adjust the cable support tube so that it is orthogonal to the machine and pointing forward before fully tightening the nuts.
- (1) Temporary Tray Support Tube
- (1) BAG 16 HEX HEAD CAP SCREW, 5/8-11 X 2"
- (1) BAG 14 THIN HEX NUT, 5/8-11
- (2) 15/16" or Adjustable Wrenches

Instructions
- The purpose of the Temporary Tray Support Tube is to provide additional support to the center of the Chip Tray during the concrete pouring and curing process. It will remain in place until the concrete has cured for at least 5 days, at which point it will be removed. Make sure that the temporary tray support does not get inadvertently displaced after the concrete is poured and before the 5 day wait period is completed.
- Screw the BAG 14 nut onto the BAG 16 hex head cap screw.
- Insert the screw into the end of the Temporary Tray Support Tube.
- Position the tube under the Chip Tray and approximately in the center as shown.
- Preventing the bolt from rotating with one hand, use the other hand to rotate the nut counter-clockwise. Doing this will drive the head of the bolt up toward the underside of the chip tray. Continue rotating the nut until the bolt head is in contact. Turn the nut one more full rotation (use wrench if needed) to further preload the bolt into the tray.
- Step back and visually inspect the cable support tube to make sure it is vertical in both planes of view. If it is not, make adjustments until it is.
3: Concrete Pour
The concrete pour is a critical stage of the assembly of your MR-1. You must watch all videos, gather all required tools, and fully understand the entire process before attempting. Once the concrete is poured, any mistakes made cannot be fixed! The process is outlined in the following videos:
In addition to this video we have provided a text checklist to use as a reference during this step. This guide should not be used in place of watching the above video but only to supplement the video during the concrete pre-pour process.
MR-1 Concrete Pre-Pour Checklist
-
Y Axis Rail Mount Orientations
- Stand at the front of the machine, opposite the cable support tube, and make sure the Front Y Axis Rail Mount is oriented so that the horizontal tie bar on the front faces of the vertical square tubes is nearest to you. If the tie bar is at the back face of the tubes, the mount is backwards and needs to be flipped around.
- Stand at the rear of the machine, in front of the cable support tube, and make sure the Rear Y Axis Rail Mount is oriented so that the horizontal tie bar on the front faces of the vertical square tubes is nearest to you. If the tie bar is at the back face of the tubes, the mount is backwards and needs to be flipped around.
-
Verify Chip Tray is Level
- Using a 48” level, check that the front, back, left, and right ends of the chip tray are level.
- Make adjustments to the leveling feet as necessary or add shim stock under the machine legs if leveling feet weren’t purchased.
-
Temporary Tray Support is Installed
- Make sure the temporary support tube is centered under the chip tray and that the holding nut has been preloaded one full turn after contact into the bottom of the tray.
- Check that the temporary support tube is standing vertical when viewed from the front and side of the machine.
-
Inspect Side Drain Flow
- If flood coolant system or drain kit has not been selected, skip this step. NOTE: once the concrete has been poured, a coolant drain system cannot be added. Be sure to consider future options before permanently pouring concrete.
- Using two cups, hold an empty cup under the left drain and pour a full cup of water through the drain to ensure good flow.
- Repeat this step for the other drain and correct any blockage or incorrect installation.
-
Inspect Y-Axis Rail Stiffeners
- Take one of the Y-Axis rail stiffeners and hold it up to the inside face, closest to the cable support tube, and make sure the holes line up with the corresponding threaded holes in the side of the y-axis rail.
- Repeat this step with the other three Y-Axis rail stiffeners and make sure all holes line up with the inside face of the y-axis rail.
-
Verify Position of Rails and Mounts
- Using a tape measure, measure the front and back width of the y-axis rails from the inside face of the slot, closest to the cable support tube, to the other inside slot face. This should measure 34”. Redo y-axis rail assembly if adjustments are needed.
- Measure the diagonal distance between the outside corners of the y-axis rails. These two measurements, front right to back left and front left to back right, should be identical within 1/16” and should measure around 49 ½”.
- Measure the distance between the front face of the vertical tube and the front edge of the chip tray. This should be 8.25”. Do this measurement for the front left and front right faces.
- Make sure the outside faces, farthest from the cable support tube, of the y-axis rails measure the same distance to the outside edge of the chip tray. This measurement should be close to 3 ¼” and will center the full y-axis rail assembly.
- Use the two base plate positioners and make sure the positioner tabs will drop into the y-axis linear bearing slots on the front and back ends of the y-axis rails.
Before beginning to pour your concrete, please watch and understand the following video:
| Concrete Bag Weight | Suggested Starting Water Mix per Bag |
|---|---|
| 60lb Bag | 5 pint Water / Bag |
| 80lb Bag | 6.7 pint Water / Bag |
- 480lbs of 4,000 PSI Ready Mix Concrete (6x 80lb bags or 8x 60lb bags). Not quick curing. Double check for correct concrete.
- MR-1 Machine as assembled
- None
- A friend or helper
- Concrete mixing tub (or concrete mixer if you have one!)
- Large measuring cup that has volume in pints labeled on the side
- Rubber Mallet
- Tape measure
- Shovel, Scraper, or Hoe, etc. to mix concrete
- Gloves and Dust Mask for PPE
- Block of wood for smoothing
- Painter’s tape

Instructions
- Purchase 480 lbs of Ready Mix Concrete (min 4,000 PSI) locally. You can use 6x 80lb bags or 8x 60lb bags. The following mix ratios assume 60lb bags, but smaller or larger bags may be used adjusting the water mix ratio accordingly.
- Remove both mesh drain covers. These will be reinstalled at a later step.
- Seal coolant drain holes with painter’s tape.
- Get another person to help you with the concrete mixing and adding to ensure a smooth, quick process.
-
Mix one bag of concrete with the appropriate water ratio and dump into the chip tray. Reference the
table above for suggested water mix and the video above for a demonstration of the desired consistency..
We have found that it helps to have one person mixing concrete while the other is spreading it out into the tray simultaneously.
Using the block of wood, spread the concrete evenly throughout the chip tray to remove high spots and fill in low ones.
After each bag, use a rubber mallet to tamp the chip tray on the bottom and sides so that the concrete settles.
WOOD VS STEEL TROWELThe block of wood is used to spread concrete so that water is free to bleed up through the top and ensure a smooth, strong surface. A steel trowel will seal the surface and lock water in and it should not be used at this stage! The block can also be tipped upright and used to tap in concrete in hard to reach gaps and corners.
- Repeat for all remaining bags leaving one bag (60lb or 80lb) of concrete unmixed.
- (4) Y-Axis Rail Stiffener
- (24) BAG 6 BUTTON HEAD CAP SCREW, ¼-20 X 3/8"
- 5/32" Hex Key

Instructions
- Wipe any dust from the contact surfaces.
- Line a Y-Axis Rail Stiffener up with the Y-Axis Rail and sink into the concrete with a sawing motion back and forth along the rail lengthwise.
- Align slots with the threaded holes in the Y-Axis rails and secure with 2 BAG 6 fasteners to hold in place. Make sure the stiffeners are flush to the top surface of the Y-Axis Rails.
- Repeat for the 3 other stiffeners.
- Once all stiffeners are secure, install the rest of the BAG 6 fasteners.
- (1) Baseplate Assembly (Previously Assembled)
- None
- Tape Measure
- Small Steel Trowel
- Wood Block

Instructions
- Use a tape measure to measure and a trowel to mark a line in the concrete that is 8 - 9/16” from the outside front edge of the Chip Tray (running parallel to the chip tray edge). This line will be beneficial for rough location of the baseplate when inserting into the concrete surface.
- Place the Baseplate Assembly on top of the concrete with the bolts facing down into the concrete, do not push down yet, and align the front of the baseplate with the scribe line. Make sure that the alignment tabs of the two baseplate positioners are in the correct position so that they will fit into the Y-Axis Rail slots once the assembly is lowered.
- Clear Y-Axis Rail slots of dust and debris.
- Push the Baseplate Assembly down into the concrete using a sawing motion back and forth while maintaining its position to the scribe line and Y axis rail slots. Push the plate down until the alignment tabs rest on the bottom of the slots in the two Y-Axis Rails. Note: Due to the raw extrusions used for the baseplates, it is possible that not all four of the tabs will sit flat into the Y Axis Rail slots. If this happens, make sure that the tabs at 2 opposing corners are sitting flat into the Y Axis Rail slots. Then, simply using a mallet to equalize the air gap between the tabs and slot surfaces at the 2 remaining opposing corners. See the concrete pouring video for further explanation.
- Measure the distance from the outside front edge of the chip tray to the front of the baseplate. Adjust the baseplate until it measures precisely 8 - 9/16”.
- Thoroughly tamp the top of the baseplate and bottom of the chip tray to eliminate air pockets and settle concrete so that it interlocks into the underside of the assembly.
- Use a wood block to smooth the concrete moved by the installation of the Baseplate Assembly and Y-Axis Stiffeners.
- None
- None
- Rubber Mallet
- Wood Block
- Steel Trowel
- Shop towels or old fabric towel to absorb top bleed water

Instructions
-
Mix the last (60 or 80 lb) bag of concrete and evenly disperse concrete around
the base so that the aluminum baseplate is protruding above the surrounding concrete
level by approximately ¼”.
- Fill concrete up flush to the top of the coolant drains if you did not purchase the separate epoxy coating. You want to have a smooth level of concrete so that coolant will flow freely to the side drains without any low spots.
- If you plan to perform the Epoxy Top Coat step later, be sure to leave the concrete level approximately ⅛” below the side drain’s top surface.
- Fill in any low spots and level the concrete surface. This step doesn’t need to be perfect, you're just looking to make a good surface for coolant flow.
-
If there are gaps between the alignment tabs in the baseplate positioners and the Y-Axis rail
slots that is fine as long as 2 diagonal tabs are touching. Using the rubber mallet, tap down
the corners of the baseplate until you have at least 2 diagonal tabs touching the slot. Then
tap the non-touching corners of the baseplate until the gaps between the tabs are even. This
will center the baseplate stock enough for final decking later when the machine is running.
- These gaps are from minor variations in the baseplate and will not affect performance once the baseplate has been re-faced in a later assembly step.
- Tamp the chip tray to remove the excess bleed water from the top of the concrete and dab dry with shop towels or old towels. When finished the concrete top surface should be very dry with no standing water anywhere. NOTE: Performing this step is critical to ensure that the top surface of concrete solidifies. If too much bleed water is left on the top surface, it will create a powdery finish.
- Wipe the outside surfaces of the machine clean to remove concrete residue while it is still wet.
- Wait for the concrete surface to dry until a thumb press will sink no more than 1/8" into it with moderate pressure. The key to troweling a good surface is making sure that it is adequately dry and cured first. You may need to wait 1-2 hours before troweling can be performed. For reference, concrete can be walked on before it is ready to trowel so don’t do it too early if you want a good, tight surface!
-
Hold the steel trowel at a very slight angle and use sweeping motions to smooth the concrete surface.
- Leaving hard to reach concrete unsmoothed in this step is acceptable.
- Leave the machine assembly and concrete to sit for 5 days. This is very important for concrete strength and stability. After this, you can continue on to either the Epoxy Top Coat step or you can begin machine assembly. Do not move or re-level your machine until at least 20 days after the concrete pour.
- Pro Marine Epoxy Kit (2 Parts)
- MR-1 Machine (as assembled with concrete cured)
- None
- Brush
- Disposable mixing cup with volume graduations that can hold approximately 1 quart
- Paint stirring sticks
- Latex gloves
- Heat gun or propane torch
- 2” Paint Brush

Instructions
- Remove the mesh screens from both side drains and set aside.
- Carefully remove stray concrete and debris from drain perimeters using a flat head screwdriver and compressed air/brush.
- Remove the old tape over the drain holes and re-seal with fresh tape. Seal off the entire inside rectangle of the drains with layered tape.
- Remove the old tape over the drain holes and re-seal with fresh tape. Seal off the entire inside square of the drains with layered tape.
- Use a brush across the surface of the dried concrete to remove any loose particulate.
- Using compressed air, a shop vacuum, or a dry rag to thoroughly clean the surface of the concrete to remove any dust or cement debris. The concrete must be clean in order for the epoxy to adhere to it. Do not use water to clean the concrete! Be sure to also clean the exposed edges of the Baseplate, Y Axis Rail Mounts, and Y-Axis Rail Stiffeners.
- Apply masking tape to the top surface of the chip tray flange.
- To complete the epoxy pour, gather the items listed in Tools above.
- Find the syringe that contains the pre-measured amount of pigment dye and add it to part B of the epoxy kit. Then add in the small ball bearings to aid in mixing and lightly shake/rotate the bottle until there is a consistent uniform color. This may take several minutes to get the dye to mix fully into the epoxy.
- Add 10 oz of Part A and 10 oz of Part B to the mixing cup. Mix the epoxy for 2-3 minutes with a stir stick. Make sure to periodically scrape the bottom and sides when mixing. Do not mix for more than 10 minutes.
- Pour the epoxy onto the concrete in small quantities all around the base. Use the paint brush to paint a thin and even coat of epoxy onto the concrete. BE sure to coat the sides of the baseplate, the exposed inside edges of the chip tray, and the area surrounding the side drains for full sealing. Do not apply too much epoxy, the goal at this stage is to ensure complete coverage of the concrete when painted on the surface.
- If there are any bubbles in the seal coat, use a heat gun, blow dryer, or propane torch to pop the bubbles. Hold the torch 6-10 inches away and do not dwell in any one spot. Use broad strokes back and forth over the bubbles to pop them.
-
Allow 6-8 hours for the seal coat to set up before proceeding to the flood coat process.
Epoxy Seal Coat!WARNING! If the seal coat is allowed to cure for more than 10 hours, use 320 grit sandpaper and thoroughly scuff up the surface and then wipe it clean with acetone or denatured alcohol.
- Mix at least a quart of part A and a quart part B epoxy. When pouring, keep an eye out for the ball bearings and remove them from the mixing container so they don’t end up on the epoxy surface.
- Pour the epoxy evenly over the entire area of the concrete. The epoxy will naturally flow to fill in any low spots and level out. Continue pouring the flood coat until the epoxy level is exactly even with the rim of the side drains. If epoxy overflows into the side drains, use a rag to wipe it up before it cures.
- Mix additional quarts of epoxy as needed until the surface is flush with the side drains.
- Use the propane torch, heat gun, or blow dryer to pop any bubbles that rise to the surface.
- Allow the Epoxy flood coat to cure for 24 hours before continuing with machine assembly. Full cure is achieved in 72 Hours.
4: Y-Axis Motion
- MR-1 Machine with cured concrete
- Shims
- None
- Coplanarity Check Gage
- Dial Indicator
- 5/32" Allen Wrench
- 3/16" Allen Wrench
Instructions
- Follow Video Instruction to finely adjust the Y-Axis coplanarity before continuing with Y-Axis motion.
- (2) Y-Axis Linear Rail w/ Bearings
- (24) Mounting Hole Cap
- (24) BAG 11 SOCKET HEAD CAP SCREW, M5 X0.8 X 16 mm
- Tape Measure
- 4mm Hex Key
- Small Hammer/Mallet & Punch

Instructions
-
Locate the Y-Axis Linear Rail and Bearing assemblies. Note that the Y-Axis Linear Rail bearings
have a wider mounting flange than the similar looking X-Axis Linear Rail assemblies.
Be sure to install the correct rails.
LINEAR RAIL BEARINGSIMPORTANT: Do not either deliberately or accidentally remove the linear bearings from the linear rail. It is nearly impossible without specialized tools to reinstall a linear bearing once removed. The replacement cost of the linear rail assembly will not be covered by warranty.
- Thoroughly clean and brush the Y-Axis Rail slots and the bottom surface of the linear rails. Any debris in these critical joints will decrease the accuracy of the machine.
- Install each Y-Axis Linear Rail using the BAG 11 fasteners shown. Make certain that the rail is oriented such that the reference edge on the side of each linear bearing (shiny surface) is pointing inward towards the machine centerline as shown. Do not tighten the screws yet. If the Linear Rail does not drop into the slot, check for and remove any burrs preventing proper assembly.
-
Adjacent to one of the mounting screws, push the linear rail firmly against the inside edge of the
slot (push in the direction towards the machine baseplates). While holding that pressure, tighten
the screw. Proceed to the next screw and perform the same operation. Do this for all screws on both
the LH Linear Rail and the RH Linear Rail. Pushing the rail inward while tightening guarantees that
the rail is seated against the reference edge of the precision machined slot.
LINEAR BEARING ORIENTATIONWARNING: Be sure to double check that the orientation of the Linear Rail Bearings are correct before inserting the mounting hole caps. Once installed the mounting hole caps cannot be removed without destroying them.
- Using a small mallet and punch, lightly tap one Mounting Hole Cap into each mounting hole. The goal is to only insert the cap until it is flush to the surface of the linear rail. Verify that each linear bearing can glide across the mounting holes without resistance.
- (2) XY Motor Mount (1 per rail)
- (2) XY Ballscrew Bearing Mount (1 per rail)
- (4) BAG 4 SOCKET HEAD CAP SCREW, ¼-20 X 1.25"
- (4) BAG 9 SOCKET HEAD CAP SCREW, ¼-20 X 3"
- 3/16" Hex Key

Instructions
- Secure the XY Ballscrew Bearing Mount to the lefthand Y-Axis Rail using the BAG 4 fasteners shown. Be sure to firmly press the mount forward in order to seat it against the locating edge when tightening the screws.
- Secure the XY Motor Mount to the lefthand Y-Axis Rail using the fasteners shown. Be sure to firmly press the mount forward in order to seat it against the locating edge when tightening the screws.
- Repeat steps 1-2 for the righthand Y-Axis Rail.
- (3) Ball Screw Assembly
- (3) BAG 26 SET SCREW, M6 X 8mm
- 3mm Hex Key

Instructions
- Locate the 3 individually wrapped Ball Screw Assemblies. !!!IMPORTANT!!! DO NOT ALLOW THE BALLNUT TO SPIN OFF THE BALL SCREW. IT IS NEARLY IMPOSSIBLE TO RE-INSTALL THE BALL NUT ONTO THE BALL SCREW. YOU WILL BE REQUIRED TO PURCHASE A REPLACEMENT.
- Install one BAG 26 M6 Set Screw into the threaded hole in the flange of each ball nut as shown.
- Note: Each ball nut comes pre-greased from the factory for immediate use. Periodic lubrication of the ball nuts can be done by placing a dab of appropriate grease into the thread roots of the ball screws. This process is covered in a later video of the assembly manual.
- (2) Y-Axis Motor (1 per side)
- (2) Y-Axis Ball Screw and Ballnut Assembly
- (2) Motor Coupler with screws
- (4) 708-2RS Angular Contact Ball Bearings (2 per screw)
- (2) XY Ballscrew Bearing Mount (1 per rail)
- (8) BAG 10 SOCKET HEAD CAP SCREW, 10-24 X 1/2"
- (2) BAG 24 LOCKNUT, 5/16-18
- Padded Pliers
- 9/16" Wrench
- 5/32" Hex Key
- 3/32" Hex Key

Instructions
- Locate the 708-2RS Angular Contact Ball Bearings. Note that each bearing has one red seal and one blue seal. Install the bearings into the counterbores of the XY Ball screw mount WITH THE RED SEALS FACING OUTWARD. Installing the bearings backwards will cause irreparable damage and require replacements to be purchased. With both bearings installed, you should only be able to see the RED seal when looking at the XY Ball Screw Mount.
- Locate the Y Axis Ball Screw assemblies. Note the orientation of the flange of the ball nut- it should be oriented on the same side of the ball screw that is turned down to ¼” and not threaded (see graphic). You will have a quantity two Y Axis Ball Screws, and quantity one X Axis Ball Screw. The X Axis Ball Screw will have the ball nut oriented the opposite direction on the screw compared to the Y Axis Ball Screws.
- Insert the threaded end of the ball screw into the 708-2RS bearings while keeping the bearings seated in their respective bores.
- Slide the Motor Coupler onto the other end (non-threaded end) of the ball screw.
- Install the Y-Axis Motor using the fasteners shown and with the motor oriented such that the cable exits from the top. The motor shaft should insert into the end of the Motor Coupler as shown. Do not tighten the motor coupler at this step; it should just spin freely on the motor shaft and ball screw end.
-
See the video below for more details about this step.
IT IS HIGHLY RECOMMEND THAT YOU FOLLOW THESE STEPS IN THE VIDEO BELOW USING A DIAL TEST INDICATOR
TO ENSURE PROPER INSTALLATION.
Using padded pliers (or regular pliers with rubber wrapped around the ball screw thread), grip
the ball screw thread right up next to the XY Ball Screw Mount to prevent the screw from rotating.
Next, tighten the BAG 24 locknut slowly until there is no perceptible backlash in the angular contact
bearings. If installed correctly, you should be able to tighten the nut slowly with constant pressure
and then stop as soon as it feels tighter to turn indicating that the angular contact
bearings on both sides of the mount have been seated properly without lash. Push and pull hard along
the axis of the ball screw and make sure that it is tight in the bearings without any play. Next,
check to see if there is excessive drag by rotating the ball screw. If the ball screw can not be
turned freely by hand in the bearings, slightly back off the lock nut and test the resistance again.
NoteThe ideal way to tighten the locknut is by simultaneously checking the bearing lash using a dial indicator while incrementally tightening the nut. As the locknut is tightened, the axial bearing lash will decrease and this is measurable with a dial indicator. The objective is to tighten the nut right up until there is no lash, but not any further. Otherwise bearing life will be shortened and/or load on the motor will be increased. Please see video for even more explanation of this process.
- Tighten the middle two screws of the motor coupler. Next, tighten the outboard screws. Again, further tighten the middle two screws followed by the outboard screws.
- Repeat steps 1-7 for the other side.
Instructions
- Follow Video Instruction to set the bearing lash.
- Failure to fully seat the angular contact preload nut properly will result in lash in your motion system. This will most likely cause decreased cutting performance and accuracy issues. If you have questions about this procedure, please reach out to our customer support team for assistance.
5: Y-Axis Carriages
Next, we'll be attaching the Y-Axis carriages to the linear bearings.
- (2) Y-Axis Carriage
- (16) BAG 12 SOCKET HEAD CAP SCREW, M6 X 1 X 15mm
- 5mm Hex Key

Instructions
- Adjust the location of the Y-Axis Linear Rail Bearing Carriages such that the ball nut is located between them as shown.
- Thoroughly clean all of the machined surfaces on the underside of the Y Axis Carriages. Also clean and wipe any debris off of the linear bearing surfaces and reference edges that will be mated during this step.
- Place the Y Axis Carriage onto the linear bearings and adjust the locations of the bearings until the holes in the casting line up to the threaded holes in the tops of the linear bearing carriages. Make sure the Y Axis Carriage is oriented as shown in the graphic with the threaded hole in the side of the casting facing the Y Axis Stepper Motor. Install the 8 BAG 12 socket head cap screws, but do not tighten.
- Using firm hand pressure, push the Y Axis Carriage outboard (in the direction away from the machine base plate) in order to seat it against the shiny inner reference edges of the linear bearings. Tighten the eight screws.
- (2) Y-Axis Ball Nut CLamp Bracket
- (2) Y-Axis Rail Sub-Assembly
- (2) BAG 13 DOWEL PIN, 5/16 X 3"
- (2) BAG 15 SOCKET HEAD CAP SCREW, ¼-20 X 1-1/8"
- 3/16" Hex Key

Instructions
- Insert the BAG 13 dowel pin into the hole in the side of the Y Axis Carriage. The end of the dowel pin should be flush with the edge of the carriage.
- Place the Y-Axis Ball Nut Clamp Bracket over the ball nut as shown. NOTE: The side that has the protrusions should contact the flange of the ball nut.
- Secure the Y-Axis Ball Nut Clamp Bracket using the BAG 15 screw. Tighten the screw to firmly clamp the ball nut against the machined internal face of the carriage. NOTE: Make sure this bolt is firmly tightened on both Y1 and Y2 Carriages.
- Perform these same steps for the other side of the machine.
6: Install Gantry
Next, we'll be attaching the X-Axis Gantry beam to the Y-Axis carriages.
- (1) X-Axis Gantry
- (2) X-Axis Linear Rail with Bearings
- (24) Mounting Hole Cap (12 per rail)
- (24) BAG 11 SOCKET HEAD CAP SCREW, M5 X0.8 X 16 mm
- 4mm Hex Key
- Small Hammer/Mallet & Punch

Instructions
-
Locate the X-Axis Linear Rail and Bearing assemblies. Note that the X-Axis Linear Rail bearings
have a narrower mounting flange than the similar looking Y-Axis Linear Rail assemblies. Be sure
to install the correct ones.
LINEAR RAIL BEARINGSIMPORTANT: Do not either deliberately or accidentally remove the linear bearings from the linear rail. It is nearly impossible without specialized tools to reinstall a linear bearing once removed. The replacement cost of the linear rail assembly will not be covered by warranty.
- Thoroughly clean and brush the X-Axis Gantry mounting surfaces as well as the bottom surface of the linear rails. Any debris in these critical joints will decrease the accuracy of the machine.
- Install each X Axis Linear Rail using the fasteners shown. Do not tighten the screws yet.
-
Adjacent to one of the mounting screws, firmly push the linear rail against the inside reference
edge that is machined into the X Axis Rail. While holding that pressure, tighten the screw. Proceed
to the next screw and perform the same operation. Do this for all screws on both the upper and lower
linear rails.
LINEAR BEARING ORIENTATIONWARNING: Be sure to double check that the orientation of the Linear Rail Bearings are correct before inserting the mounting hole caps. Once installed the mounting hole caps cannot be removed without destroying them.
- Using a small mallet and punch, lightly tap one mounting hole cap into each mounting hole. The goal is to only insert the cap until it is flush to the surface of the linear rail. Verify that each linear bearing can glide across the mounting holes without resistance.
- (1) X-Axis Gantry Assembly (Previously Assembled)
- None
- (8) BAG 1 SOCKET HEAD CAP SCREW, ¼-20 X 5/8"
- 3/16" Hex Key

Instructions
- Turn the Y-Axis ball screws until the carriages are contacting the XY Ball Screw Bearing Mounts at the front of the machine.
- Meticulously clean the machined mating surfaces of the Y Axis Carriages and the X Axis Gantry Beam. If any dings/dents are present in these surface, stone/file them flat (refer to previous video in the assembly manual for surface preparation).
- Carefully place the X Axis Gantry onto the Y-Axis Carriages and secure it using the fasteners shown.
- NOTE: The X-Axis will be precisely squared to the Y-Axis in a later step once the machine is running under power.
- (1) Linear Bearing Mount
- (8) BAG 18 SOCKET HEAD CAP SCREW, M5 X 0.8 X 18
- 3/16" Hex Key

Instructions
- Thoroughly clean all of the machined surfaces on the Lower Bearing Mount. Also clean and wipe any debris off of the linear bearing surfaces and reference edges that will be mated during this step.
- Secure the Lower Bearing Mount to the lower linear bearings using the fasteners shown. When tightening the screws, pull the lower bearing mount toward the front of the machine so that the back precision surface edges of the linear bearings are in contact with the ledge machined into the Lower Bearing Mount as shown.
Instructions
- Follow Video Instruction to accurately shim your machine.
Enter the punched values into the following form. Pay particular attention to the positive or negative sign of the punched values. If a +/- sign is not punched, assume it is a positive value. These values can be punched positive or negative magnitude or nominal (0).
7: Install X/Z Carriage
Next, we will be installing the Spindle and X/Z Carriage assembly onto the Gantry.
- (1) X/Z Carriage Assembly
- (1) Previously Assembled Machine
- (3) BAG 2 SOCKET HEAD CAP SCREW, 5/16-18 X 2 3/8"
- (8) BAG 17 SOCKET HEAD CAP SCREW, M5 X 0.8 X 12
- 4mm Hex Key
- 1/4" Hex Key

Instructions
- Thoroughly clean the mating faces on the X/Z Carriage and linear bearings where the linear bearings will be mounted. Also clean the front edge of the Lower Bearing Mount and X/Z Carriage where the surfaces will be mated to each other as shown. Due to the weight of the X/Z Carriage Assembly, it will help to have a second person that can assist with this step.
- Lift the X/Z Carriage onto the upper linear bearings. Insert a few BAG 17 screws to hold it in place, but do not tighten them. NOTE: IF shims were previously placed take care to not displace them when setting the X/Z Carriage.
- Insert the three BAG 2 screws through the lower bearing mount and into the X/Z carriage. Do not tighten them.
- Using firm pressure, push against the face of the Spindle Cover (pushing it towards the rear of the machine) to properly position the X/Z carriage on the bearings at the top of the X Axis Gantry beam. This will properly seat the machined surface in the X/Z Carriage against the reference edges on the sides of the linear bearings. While holding this pressure, tighten the eight BAG 17 screws.
- Tighten the three BAG 2 screws.
- Previously Assembled Machine
- None
- Flashlight

Instructions
- Check that the reference edges of the linear bearings are in firm contact with the mating face of the X/Z Carriage. If there is an air gap, redo the previous step(s).
8: X-Axis Motion
Next, we'll be installing the motor mounts and ball screws necessary for X-Axis Motion.
- (1) XY Motor Mount
- (1) XY Ballscrew Bearing Mount
- (2) BAG 4 SOCKET HEAD CAP SCREW, ¼-20 X 1.25"
- (2) BAG 9 SOCKET HEAD CAP SCREW, ¼-20 X 3"
- 3/16" Hex Key

Instructions
- Secure the XY Ballscrew Mount to the X-Axis Gantry using the fasteners shown. Be sure to firmly press the mount against the locating edge when tightening the screws.
- Secure the XY Motor Mount to the X-Axis Gantry using the fasteners shown. Be sure to firmly press the mount against the locating edge when tightening the screws. Note: The orientation of the X-Axis Motor Mount is not important.
-
Check to make sure that the Motor Mount and Bearing Mount both rest on the floor of the slots
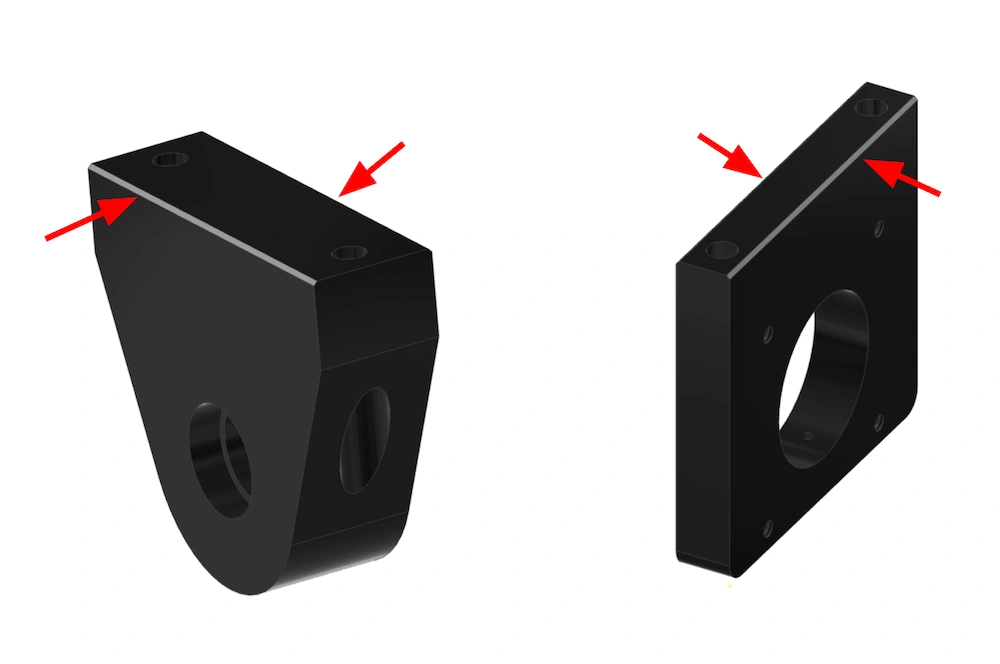
in the gantry. If they do not, use a file to chamfer the edges shown.
![]()
- (1) X-Axis Ballscrew & Ballnut Assembly
- (1) X-Axis Motor
- (2) 708-2RS Angular Contact Bearing
- (1) Motor Coupler with Screws
- (4) BAG 10 SOCKET HEAD CAP SCREW, 10-24 X 1/2"
- (6) BAG 20 SOCKET HEAD CAP SCREW, 6-32 X 5/8"
- (1) BAG 24 LOCKNUT, 5/16-18
- 9/16" Wrench
- 5/32" Hex Key
- 3/32" Hex Key
- 7/64" Hex Key

Instructions
- Locate the 708-2RS Angular Contact Ball Bearings. Note that each bearing has one RED seal and one BLUE seal. Install the bearings into the counterbores of the X-Axis Ball screw mount WITH THE RED SEALS FACING OUT. Installing the bearings backwards will cause irreparable damage and require replacements to be purchased.
- Insert the end of the X-Axis Ball Screw into the 708-2RS bearings. Make sure the ball nut is located on the right hand side of the X-Axis carriage.
- Install the motor coupler onto the other end of the ball screw and leave the screws loose.
- Install the X-Axis Motor using the fasteners shown and with the motor oriented such that the cable exits from the top. Do not tighten the motor coupler at this step.
-
See the video below for more details about this step.
IT IS HIGHLY RECOMMEND THAT YOU FOLLOW THESE STEPS IN THE VIDEO BELOW USING A DIAL TEST INDICATOR
TO ENSURE PROPER INSTALLATION.
Using padded pliers (or regular pliers with rubber wrapped around the ball screw thread),
grip the ball screw thread right up next to the XY Ball Screw Mount to prevent the screw from
rotating. Next, tighten the BAG 24 Locknut slowly until there is no perceptible backlash
in the angular contact bearings. If installed correctly, you should be able to tighten the
nut slowly with constant pressure and then stop as soon as it feels tighter to turn
indicating that the angular contact bearings on both sides of the mount have been seated properly
without lash. Push and pull hard along the axis of the ball screw and make sure that it is tight
in the bearings without any play. Next, check to see if there is excessive drag by rotating
the ball screw. If the ball screw can not be turned freely by hand in the bearings, slightly
back off the lock nut and test the resistance again.
Tightening LocknutsNOTE: The ideal way to tighten the locknut is by simultaneously checking the bearing lash using a dial indicator while incrementally tightening the nut. As the locknut is tightened, the axial bearing lash will decrease and this is measurable with a dial indicator. The objective is to tighten the nut right up until there is no lash, but not any further. Otherwise bearing life will be shortened and/or load on the motor will be increased. Please see the following video for even more explanation of this process.
- Tighten the middle two screws of the motor coupler. Next, tighten the outboard screws. Again, further tighten the middle two screws followed by the outboard screws.
- Move the X/Z Carriage and ball nut as close to the XY Ball Screw Bearing Mount as possible by rotating the ball screw by hand. At this location, install and tighten the six BAG 20 socket head cap screws. Make sure not to deflect the ball screw when tightening the screws.
9: Mount Electronics & Decals
Next, we'll mount the electronics components onto the machine.
- (1) MR-1 Electronics Enclosure
- (3) Isolation Mount
- (3) BAG 25 SERRATED FLANGE NUT, M6 X 1

Instructions
- Screw the three Isolation Mounts into the threaded holes on the back of the MR-1 Electronics Enclosure.
- Secure the Electronics Enclosure to the left rear leg of the machine using the BAG 25 nuts.
- (1) Hazard Caution Warning Decal
- (1) Machine Plate with Serial Number Decal
- (1) 'Langmuir Systems' Gantry Decal
- None

Instructions
- Apply the machine decals in the locations shown. Be sure to wipe the surfaces clean of any oil or debris before placing the decals.
- (1) High Powered Driver
- #1 Phillips Screwdriver
- 1/4" Socket
- Small Flathead Screwdriver
-
Locate the Driver Selected for Upgrade
![]()
- Remove the lid of your Electronics Enclosure by unscrewing all of the sheet metal screws.
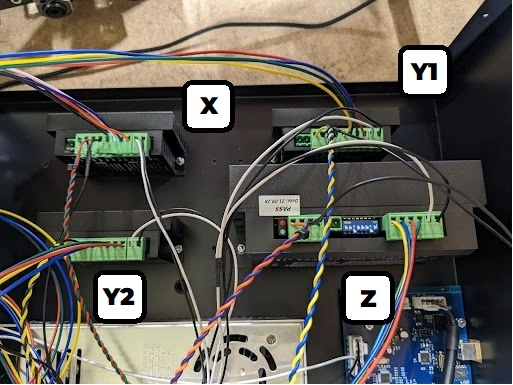
ATTENTION: 2 High Powered Drivers are required for the Y-Axis. The Y-Axis will immediately bind when operated with a single upgraded driver and be thrown out of square.
-
Disconnect and Remove Driver
![]()
- Carefully remove 3 green terminal blocks that are installed in the driver by gently pulling on the terminal block straight out, not pulling on the wires.
- Using a #1 Phillips Screwdriver and a ¼” Socket, loosen the 2 screws securing the driver to the enclosure. Remove driver and set screws/nuts aside.
-
Re-Wire Screw Terminal
![]()
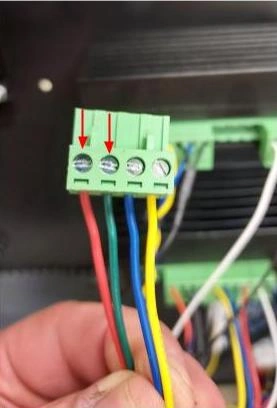
- Find the 4 wire terminal with unbraided wires. Colors will vary based on which driver is being updated.
- Using a small flat screwdriver loosen the terminals securing the left two wires on the terminal block as shown. Pull the wires out of the terminal slots.
- Reverse the position of the 2 wires so that the wires are in the opposite terminals. In the example above, the green wire should now be on the outside of the terminal block with the red wire next to the blue wire. This may vary depending on which driver you chose.
-
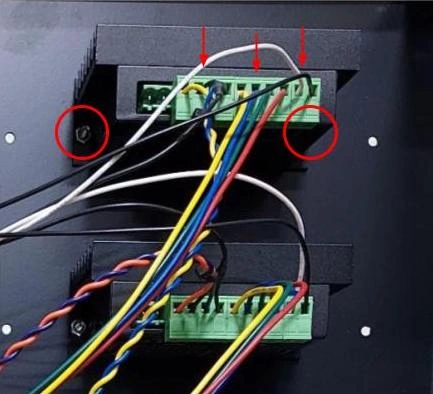
Move Mounting Screws
![]()
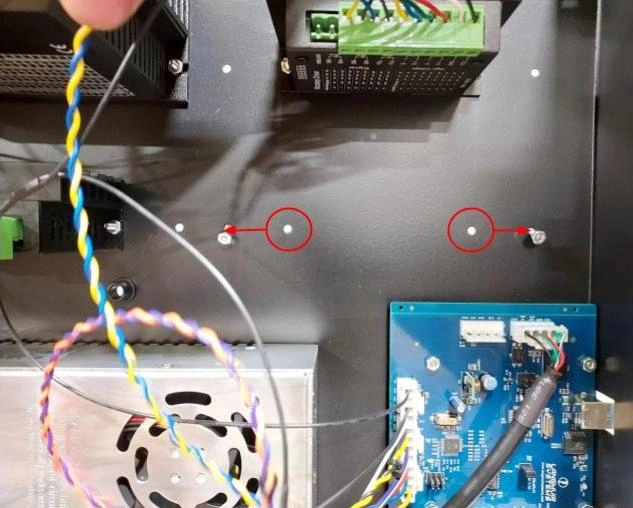
- Move the machine screws out to the next adjacent hole on each side to accommodate the larger driver (circled in red).
- Thread the nuts on a few turns and leave dangling loose as shown.
-
Install High Powered Driver
![]()
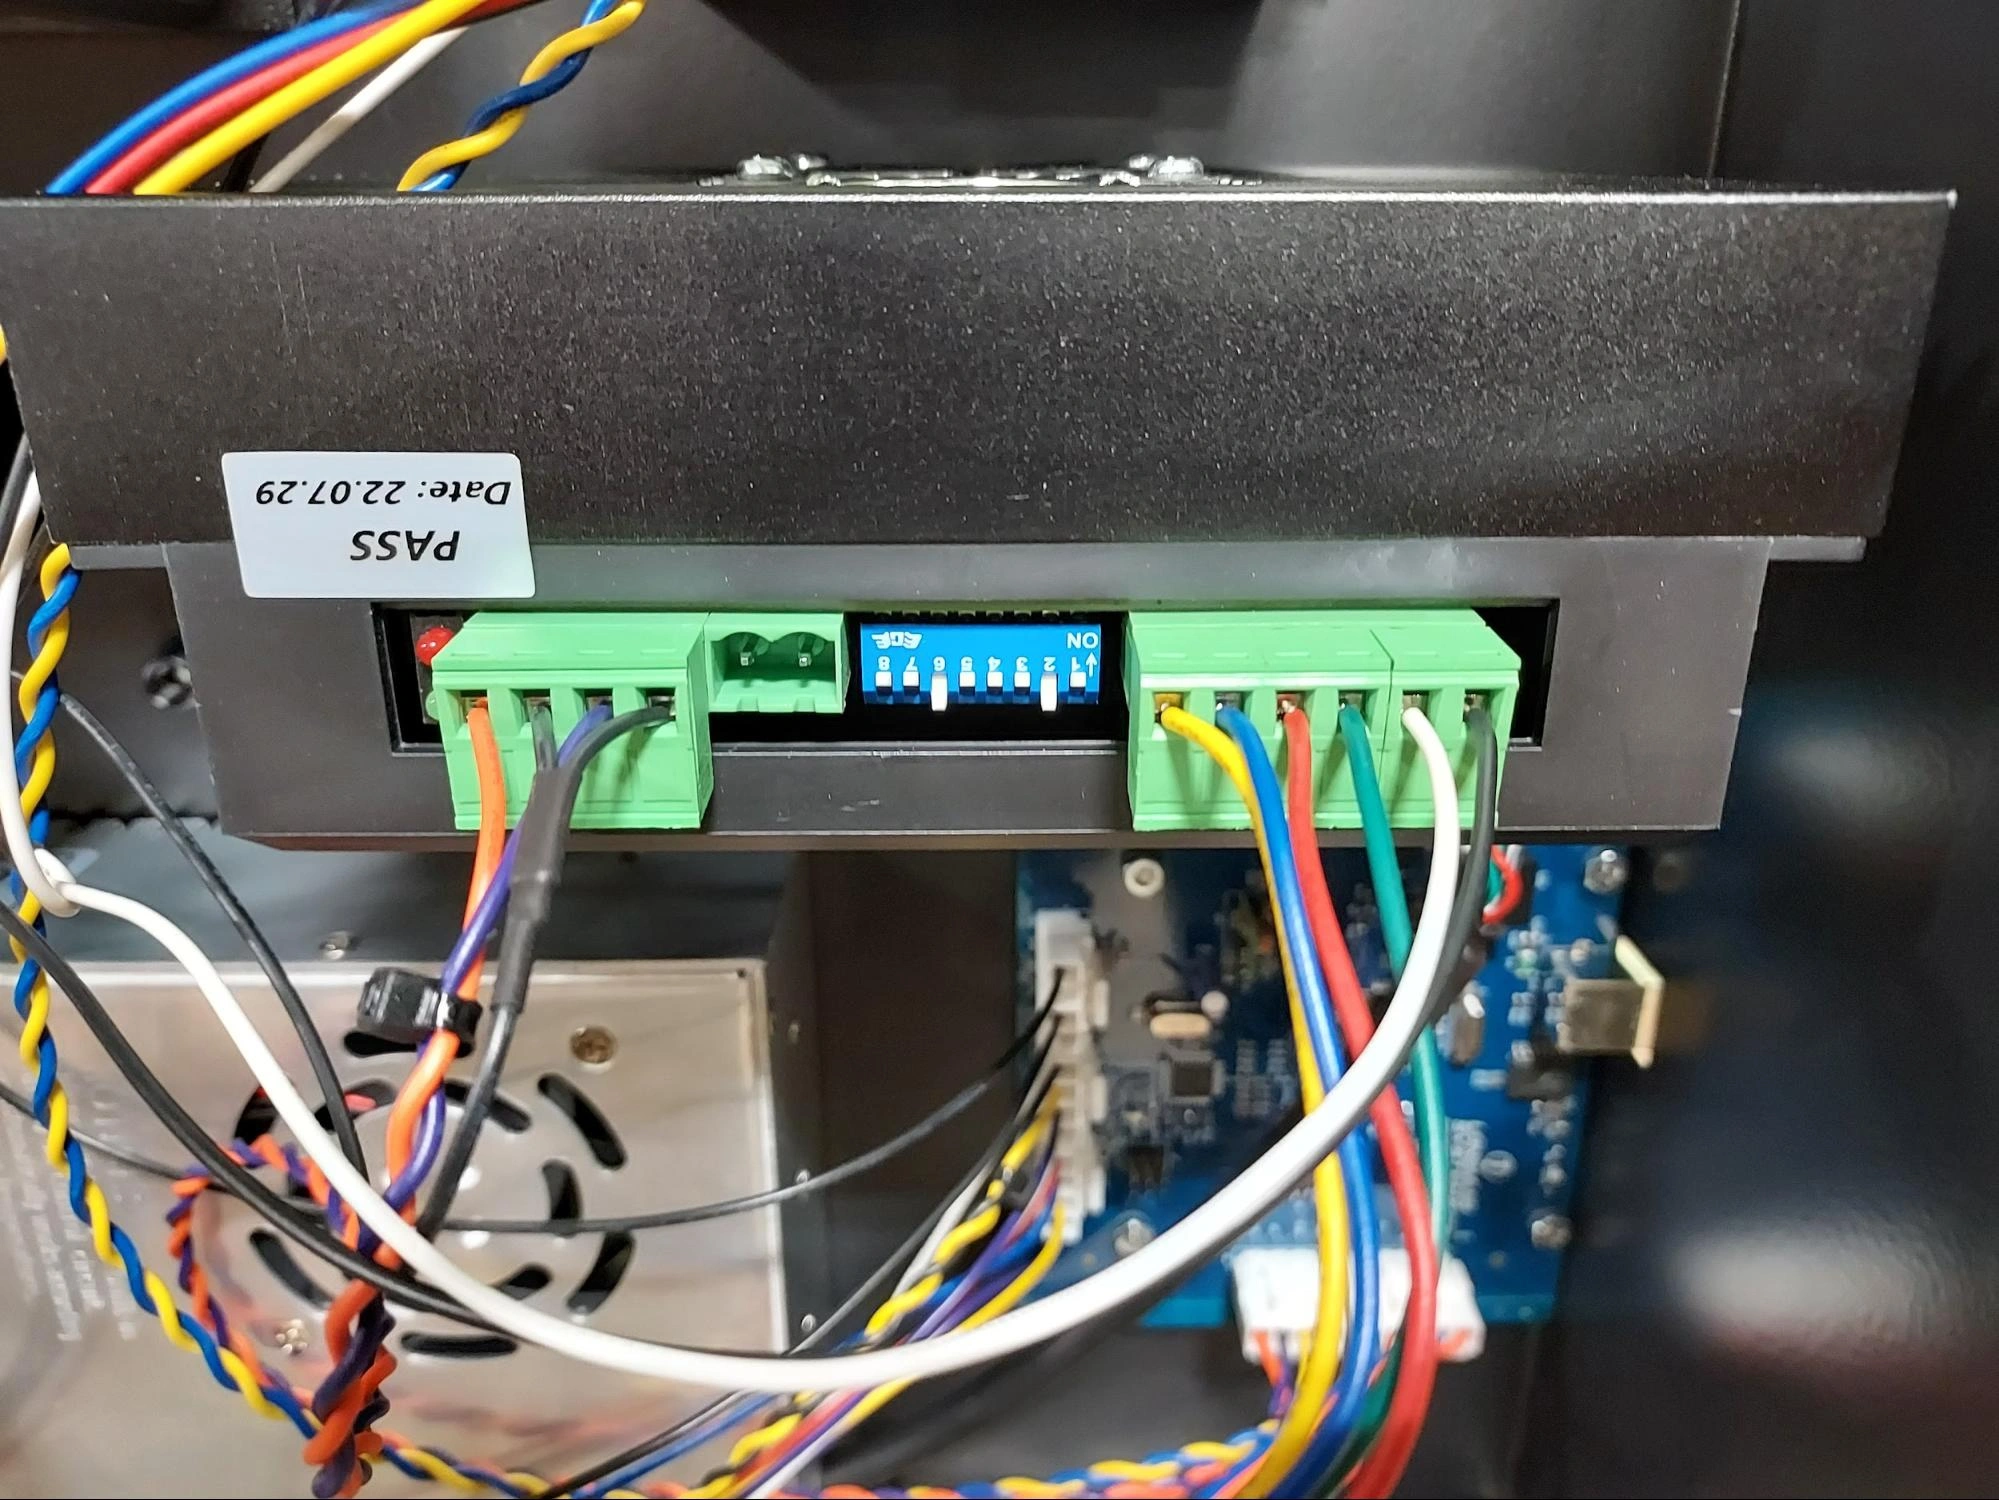
- Install larger driver by pushing the screws into the slots on both sides of the driver, secure the fasteners and reconnect the terminal blocks as shown. The driver should be oriented so that the driver fan is pointing upward as shown.
10: Control Kit / Computer Stand
- Assembled MR-1 Machine
- (1) Computer Stand Weldment
- (1) Computer Stand Stabilizer Link
- (1) BAG 1—CONTROL SERRATED FLANGE NUT, 10-24
- (4) BAG 2—CONTROL SERRATED FLANGE NUT, ¼-20
- (4) BAG 3—CONTROL BUTTON HEAD CAP SCREW, 1/4-20 X 1/2”
- (1) BAG 8—CONTROL SHEET METAL SCREW, #10 X 3/4"
- (1) BAG 9—CONTROL BUTTON HEAD CAP SCREW, 10-24 X 1/2"
If you are installing the Computer Stand, the bag titles may be different.
- 5/32" Hex Key
- 3/8" Wrench
- 7/16" Wrench
- 1/8" Hex Key

Instructions
- Attach the Computer Stand Weldment to the left front leg of the machine using the fasteners shown.
- Secure the Computer Stand Stabilizer Link to the chip tray using the fasteners shown.
- Swing the Computer Stand Stabilizer link until the bent up flange contacts the side of the Computer Stand Weldment. Secure it to the Computer Stand Weldment using the BAG 8—CONTROL sheet metal screw.
- (1) Computer Stand Tray
- (4) COMPUTER STAND HARDWARE FLATHEAD CAP SCREW, 10-32 X ½"
- (4) COMPUTER STAND HARDWARE SERRATED FLANGE NUT, 10-32
If you are installing the Computer Stand, the bag titles may be different.
- 1/8" Hex Key
- 3/8" Wrench

Instructions
- Secure the Computer Stand Tray using the fasteners shown.
- (1) Touchscreen Pivot Bracket
- (4) BAG #6—CONTROL SOCKET HEAD CAP SCREW, ¼-20 X 1/2"
- (4) BAG #7—CONTROL WASHER, ¼
- (4) BAG #2—CONTROL SERRATED FLANGE NUT, ¼-20
- 3/16" Hex Key
- 7/16 Wrench

Instructions
- Attach the Touchscreen Pivot Bracket to the Computer Stand Weldment using the fasteners shown.
- (1) Touchscreen VESA Mount
- (1) MC4000 Machine Controller PC
- (2) BAG #6—CONTROL SOCKET HEAD CAP SCREW, ¼-20 X 1/2"
- (2) BAG #7—CONTROL WASHER, ¼
- (2) BAG #2—CONTROL SERRATED FLANGE NUT, ¼-20
- (2) BAG #5—CONTROL SOCKET HEAD CAP SCREW, M3 X 0.5mm X 6mm
- 3/16" Hex Key
- 7/16" Wrench
- 2.5mm Hex Key

Instructions
- Attach the Touchscreen Vesa Mount to the Pivot Bracket using the fasteners shown. Set the angle of the Vesa Mount to approximately 45 degrees. This can be adjusted later to suit personal preference.
- Attach the MC4000 Machine Controller PC to the Vesa Mount using the fasteners shown.
- (1) Touchscreen Monitor
- (4) BAG #4—CONTROL SOCKET HEAD CAP SCREW, M4 X 0.7mm X 6mm
- 3mm Hex Key

Instructions
- Attach the Touchscreen Monitor to the Touchscreen VESA Mount using the fasteners shown.
11: Wiring
The following video covers the process of wiring the machine to the point that it can be run. The video will involve wiring the optional Control Kit, but the steps are applicable for laptop/desktop users as well.
Instructions
- Follow Video Instruction to connect all machine wiring.
12: Limit Switch Installation
In this video we're going to install the limit switches, the hard stops, jog the machine, use indicators and precision blocks to adjust alignment, and do coarse and fine adjustment of the limit switch stops.
If you have the Control Kit with the MC4000 MiniPC, you should first configure the PC and set up CutControl →.
If you do not, follow the Initial Run instructions → to install CutControl and connect your computer.
Instructions
- Follow Video Instruction to install and adjust your limit switches, studs, and touchplates.
13: Cable Management
In this video we'll cover cable routing and management.
Instructions
- Follow Video Instruction to route your cables properly.
14: Machine Homing
In this video we'll cover homing your MR-1 for the first time as well as setting your machine Soft limits.
Instructions
- Follow Video Instruction to home your machine.
15: Inspect Machine Lash
After assembly of MR-1 is complete, it’s important to perform a series of checks on your machine to ensure that assembly was done properly and that everything on the machine is tight before making the first cuts.
Instructions
- Follow Video Instruction to Inspect your MR-1's lash.
16: Flood Coolant
- (1) Coolant Reservoir Lid
- (1) 3/8" Barb Fitting
- (1) Coolant Pump
- (1) Coolant Reservoir
- None
- None

Instructions
- Secure the 3/8 Barb Fitting to the output bib of the Coolant Pump.
- Place the Coolant Pump into the Coolant Reservoir.
- Place the Coolant Reservoir Lid onto the Coolant Reservoir with the power cable exiting through the slot.
- Place the Coolant Reservoir underneath machine in the approximate center.
- (2) Drain Hose (Cut to length by user)
- N/A
- Sharp Knife or Scissors (for cutting hose to length)

Instructions
- Cut length of 1” Drain Hose to run from the barbed undersides of the Side Drains to the drain holes on the Coolant Reservoir Lid. The drain hoses should not extend more than 1” into the lid. If the ends of the drain hoses are submerged, drain performance will be reduced. Ensure that the drain hoses are short enough to prevent low spots that will reduce drain flow.
- (1) Feed Hose Grommet Mount
- (1) Feed Hose Grommet, 3/4"
- (1) Feed Hose (Cot to length)
- (1) Flood Coolant Loc-Line Mount
- (1) 3/8" Brass Hose Barb to Male 1/4 NPT
- (1) Brass Bulkhead Fitting with Hex Nut
- (1) Coolant Loc-Line Nozzle with on/off Valve
- (1) BAG #1—FLOOD BUTTON HEAD CAP SCREW, 10-24 X 5/16
- (2) BAG #2—FLOOD THREADFORMING SCREW, #8 X 5/16
- (2) BAG #3—FLOOD HOSE CLAMP
- Flathead Screw Driver
- Phillips Screw Driver
- 1/8" Hex Key
- Sharp Knife or Scissors (for cutting hose to length)

Instructions
- Secure the Feed Hose Grommet Mount onto the top of the Spindle Cover using the BAG #4—FLOOD thread forming screws.
- Install the Feed Hose Grommet into the mount.
- Secure the Flood Coolant Loc-line Mount to the bottom left side of the Spindle Cover using the BAG #3—FLOOD button head cap screw.
- Locate the 3/8 Brass Hose Barb to Male ¼ NPT. Locate the Brass Bulkhead Fitting w/ Hex Nut. Screw the 3/8 Brass Hose Barb into the Bulkhead fitting.
- Remove the hex nut from the bulkhead fitting. Insert the fitting into the Flood Coolant Loc-line Mount and secure it with the hex nut.
- Screw the Coolant Loc-line hose into the bottom of the brass fitting.
- Insert one end of the remaining length of Feed Hose through the grommet and over the barb of the brass fitting. Secure using a BAG #5—FLOOD hose clamp.
- Route the hose (with sufficient slack) along the cable support tube and down into coolant tank. Use the supplied cable ties to secure the feed hose to the cable support tube.
- Cut the feed hose to the appropriate length needed and attach it to the pump. Use a hose clamp to secure it. NOTE: Consider leaving the feed hose approximately 24” long so that if additional slack is needed between the spindle cover and the cable support tube, it is available.
- The installation of the Flood Coolant System is not complete. Before filling the reservoir with coolant, be sure to follow the manufacturers specific instructions for mix ratios.
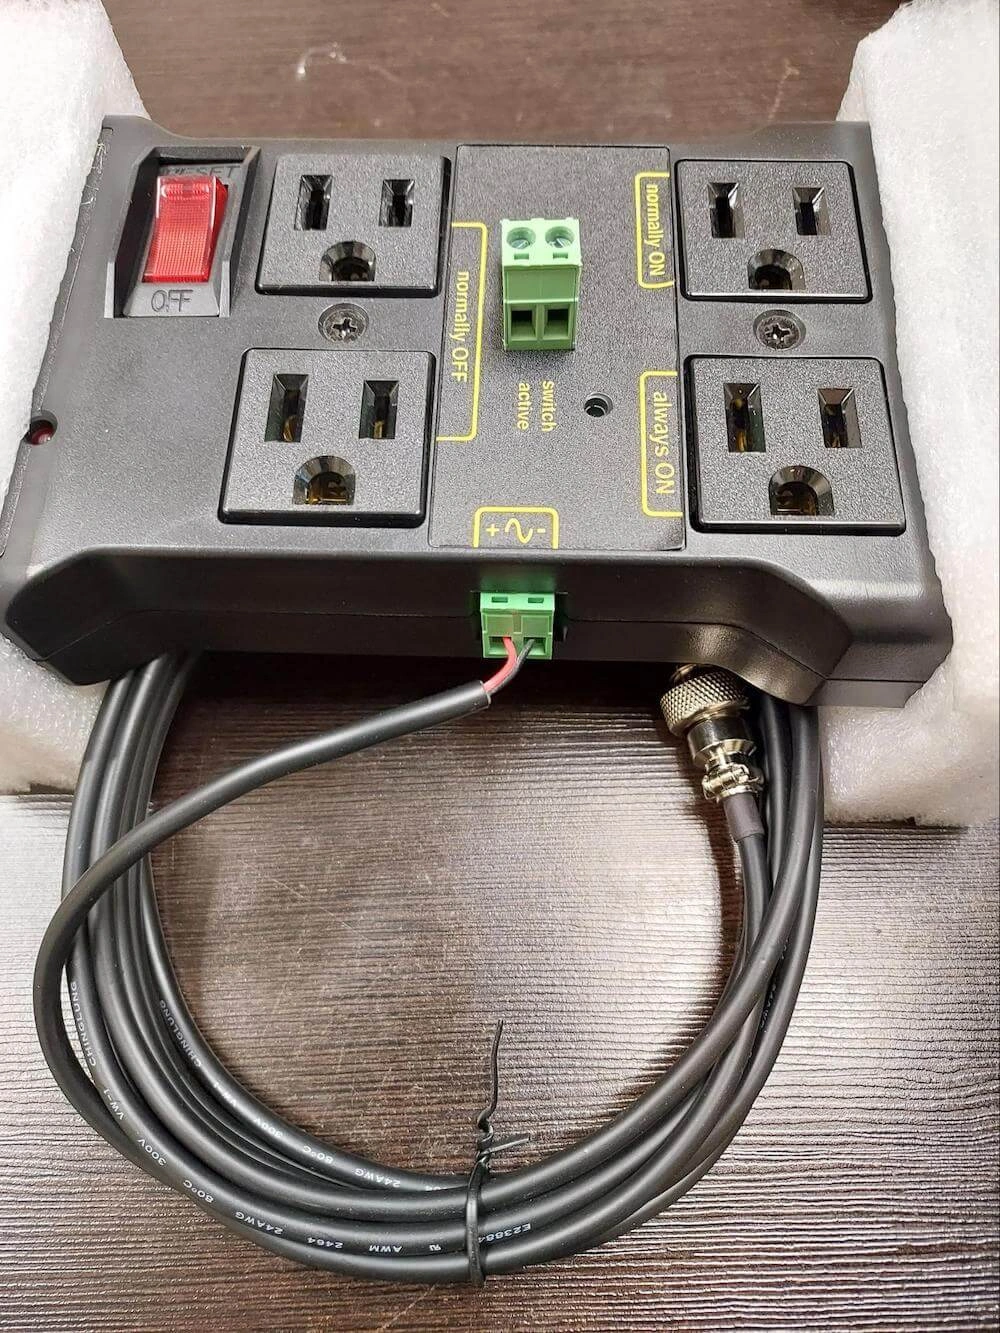
Flood Coolant Relay Instructions
-
To begin, remove relay from box and locate the green 2 pin terminal block installed into the side of
the module. Gently work terminal loose with fingers and pull straight out. You can discard this plug.
![]()
-
Inside the box, locate the Langmuir Systems flood coolant relay cable. Insert the 2 pin terminal
block end of the cable into the side of the control module where the terminal block was removed in Step 1.
![]()
-
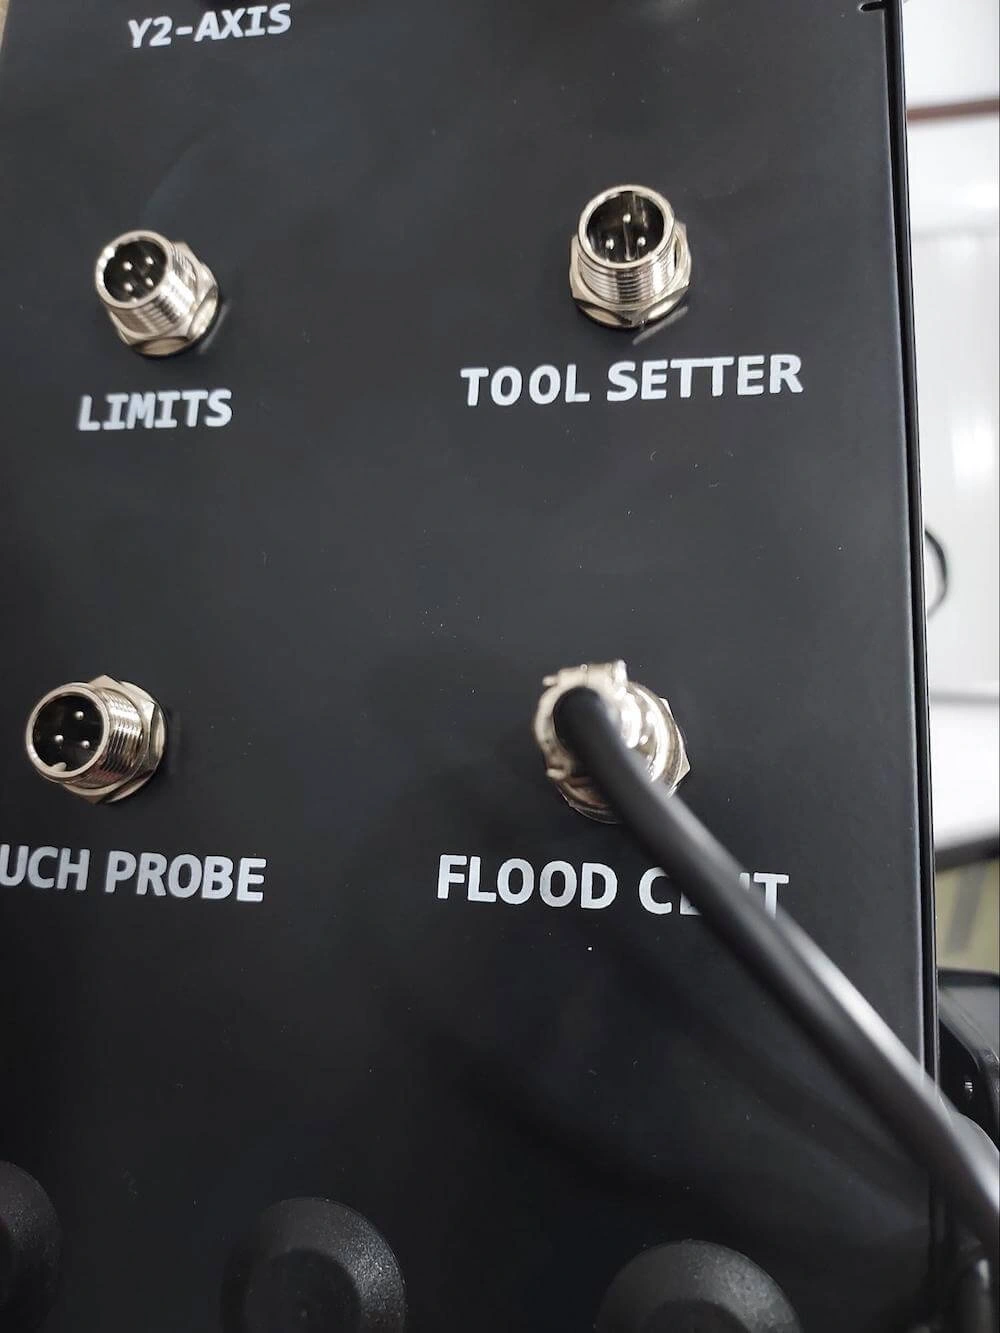
Plug the GX-12 connector end of the relay cable into the FLOOD COOLANT port on your Langmuir Systems
electronics enclosure.
![]()
-
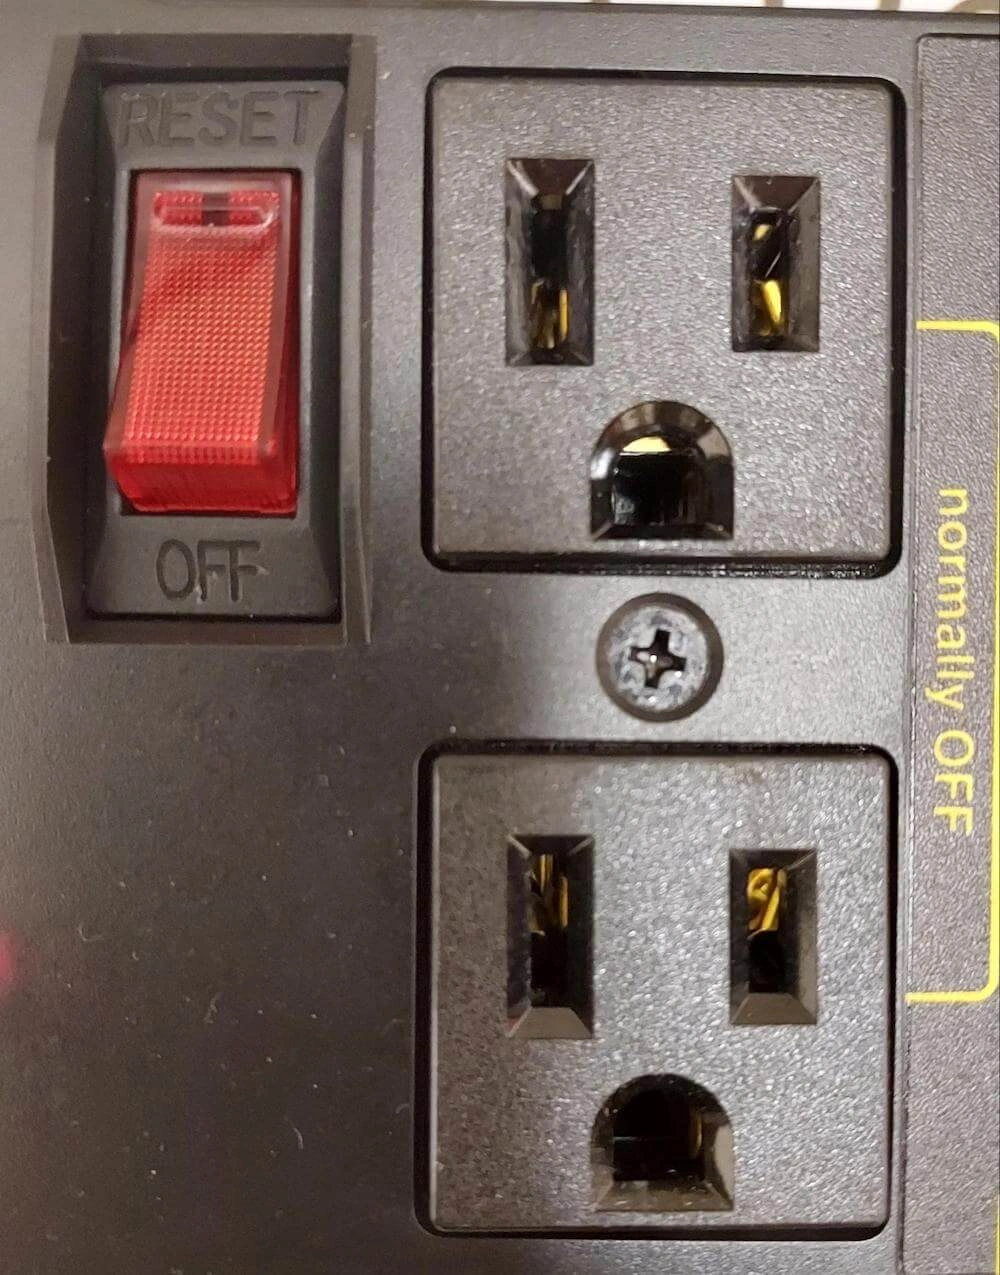
Flip red switch on relay to “reset” position.
![]()
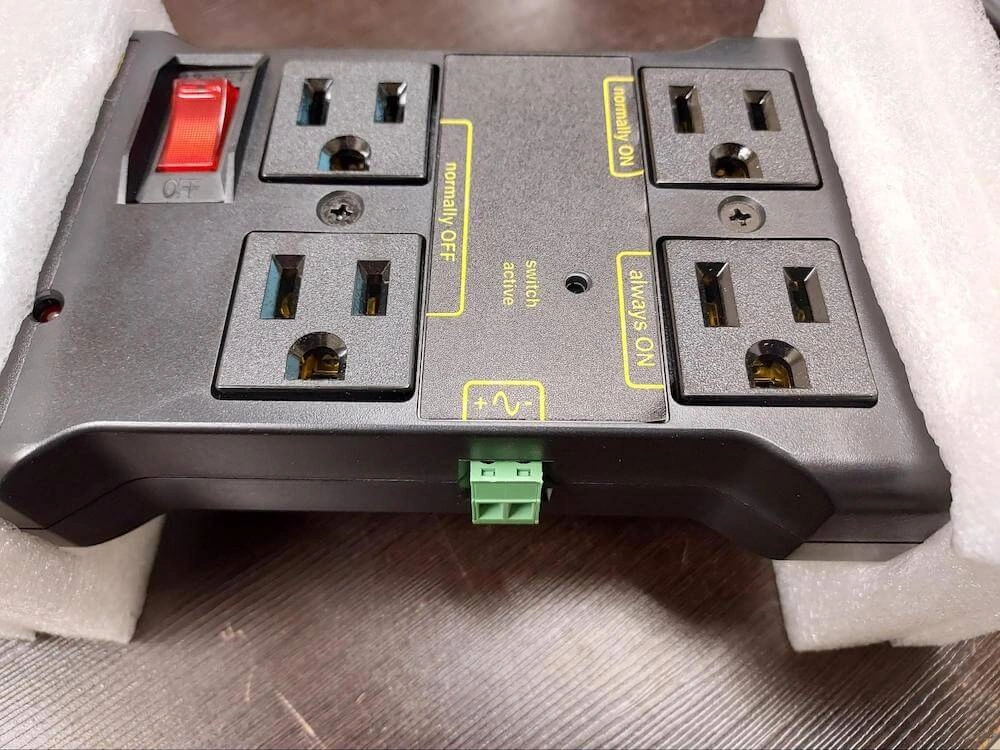
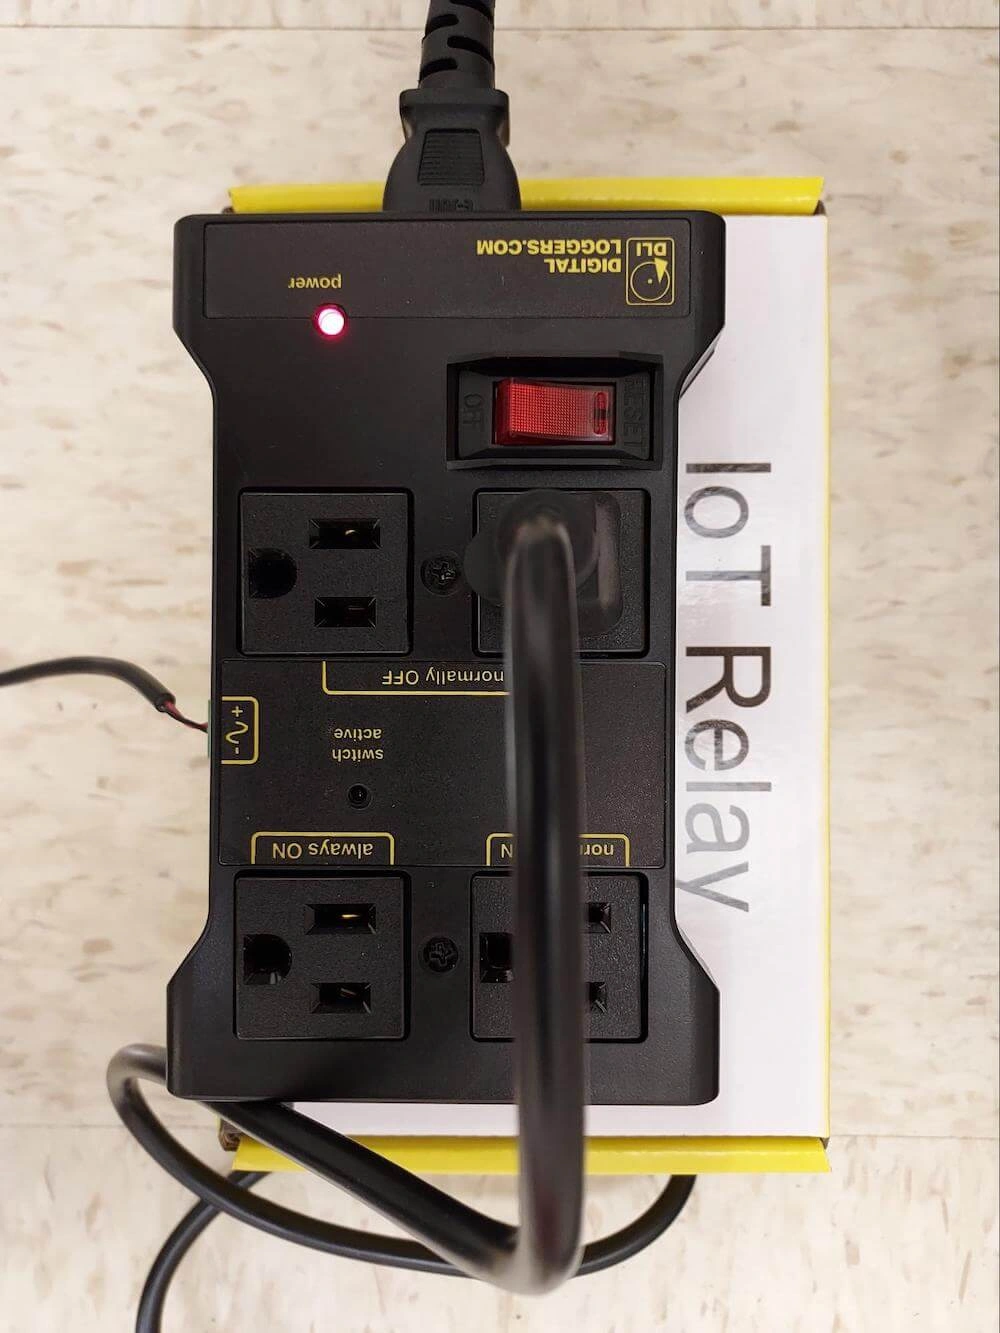
- Insert 3-prong coolant pump cable into 1 of the 2 “Normally OFF” receptacles.
- Flip the pump in-line switch to the “ON” position on the power input cable.
-
Plug in Relay Module Power Cable to 110VAC and verify that the red LED is illuminated.
![]()
17: Machine Enclosure
- (2) Side Window
- (2) Side Window Lift Bracket
- (16) BAG #1—ENC SNAP-IN NUT, 10-24
- (4) BAG #6—ENC SOCKET HEAD CAP SCREW, 10-24 X ½
- (4) BAG #9—ENC SERRATED FLANGE NUT, 10-24
- Pliers
- 5/32" Hex Key
- 3/8" Wrench

Instructions
- Using pliers, insert the snap-in nuts into each square hole. Make sure to install each nut from the correct side of the window as per the graphic.
- Secure the Side Window Lift Bracket in the orientation shown and with the fasteners shown. IMPORTANT!: Do not overtighten the screws that secure the Side Window Lift Bracket. Polycarbonate is a strong and durable material, but localized compressive loads can cause fatigue cracks to propagate. Slightly tighter than finger tight is all that is needed to ensure proper assembly. Do not forget to install the rubber washers, as these help to prevent crack formation.
- (1) Rear Enclosure Panel
- (1) Rubber Grommet
- (1) Silicone Sealant
- (7) BAG #6—ENC SOCKET HEAD CAP SCREW, 10-24 X ½
- (7) BAG #9—ENC SERRATED FLANGE NUT, 10-24
- 1/8" Hex Key
- 3/8" Wrench

Instructions
- Disconnect all cables from the electronics box and place them on top of the baseplate to temporarily get them out of the way.
- Insert the Rubber Grommet into the access hole at the top of the Rear Enclosure Panel.
- Apply a bead of the provided Silicone Sealant along the rear flange of the Chip Tray. The bead of silicone should loop around each mounting hole.
- Secure the Rear Enclosure Panel to the chip tray using the fasteners shown. Leave these screws finger tight for now.
- (2) Side Enclosure Panel
- (1) Silicone Sealant
- (16) BAG #6—ENC SOCKET HEAD CAP SCREW, 10-24 X ½
- (16) BAG #9—ENC SERRATED FLANGE NUT, 10-24
- (12) BAG #7—ENC SOCKET HEAD CAP SCREW, ¼-20 X 1/2
- (12) BAG #10—ENC SERRATED FLANGE NUT, 1/4-20
- 1/8" Hex Key
- 3/8" Wrench
- (2) 7/16" Wrench


Instructions
- Apply a bead of the provided Silicone Sealant along vertical mounting flanges on the Rear panel and the along the horizontal flanges of the chip tray. The bead of silicone should loop around each bolt hole.
- Secure each Side Panel to the Chip Tray/ Rear Panel using the fasteners shown. Leave all fasteners finger tight.
- (1) Front Enclosure Panel
- (1) Silicone Sealant
- (7) BAG #6—ENC SOCKET HEAD CAP SCREW, 10-24 X ½
- (7) BAG #9—ENC SERRATED FLANGE NUT, 10-24
- (12) BAG #7—ENC SOCKET HEAD CAP SCREW, ¼-20 X 1/2
- (12) BAG #10—ENC SERRATED FLANGE NUT, 1/4-20
- 1/8" Hex Key
- 3/8" Wrench
- (2) 7/16" Wrench

Instructions
- Apply a bead of the provided Silicone Sealant along vertical mounting flanges on the Side Panels and the along the horizontal front flange of the chip tray. The bead of silicone should loop around each bolt hole.
- Secure the Front Enclosure Panel to the Chip Tray/Side Panels using the fasteners shown.
- Tighten all of the enclosure fasteners that were previously only finger tight. Do not excessively tighten the screws so that sufficient silicone adhesive will remain in the joints to form a water tight seal.
- (1) Silicone Sealant
- None
- None

Instructions
- When inspecting each of the four corners, you’ll notice that leak paths exist where the panel flanges are bent. Apply a liberal bead of silicone along the highlighted corner seams to ensure that these leak paths are completely sealed.
- (2) Upper RH / Lower LH Hinge Brace
- (2) Lower RH / Lower LH Hinge Brace
- (2) Front Door Panel
- (2) Piano Hinge
- (2) BAG #6—ENC SOCKET HEAD CAP SCREW, 10-24 X ½
- (2) BAG #9—ENC SERRATED FLANGE NUT, 10-24
- (16) BAG #8—ENC SERRATED FLANGE NUT, 8-32
- (16) BAG #5—ENC FLATHEAD CAP SCREW, 8-32 X 1/2
- 3/32" Hex Key
- 1/8" Hex Key
- 11/32" Wrench
- 3/8" Wrench

Instructions
- Locate the four Hinge Braces that arrived with your kit. Notice that they are handed. Viewing the machine from the front, two of them are used at the lower left corner and upper right corner of the hinge mounting flange. The other two are used at the upper left and lower right corners. Identify the hinge braces that get installed at the upper left and lower left locations as shown in the graphic.
- Secure the Hinge Braces to the upper and lower side panel flanges as shown. The lower hinge brace is secured by a previously installed screw/nut so you will need to remove it before using it to attach the hinge brace. The upper hinge brace is secured with the fasteners shown. Done correctly, the holes at the other end of the hinge braces should approximately align to the holes in the front panel. It is ok if they do not perfectly align as the enclosure panels have enough flexibility to bring them into alignment with moderate force.
- Secure the Piano Hinge to the front panel flange using the fasteners shown. Note that upper and lower screws must also secure the Hinge Braces.
- Attach the Front Door Panel to the other leaf of the piano hinge using the fasteners shown. Note that the doors are not handed so either door can be installed in either location.
- Carefully close the door and check the gaps at the top and the bottom. If adjustments are needed, loosen the four screws and shift the door either up or down until the gaps are equalized at the top and the bottom.
- Repeat steps 1-5 for the righthand door.
- (2) Door Window (Polycarbonate)
- (2) Door Handle
- (2) Magnet Latch
- (20) BAG #6—ENC SOCKET HEAD CAP SCREW, 10-24 X ½
- (4) BAG #4—ENC SOCKET HEAD CAP SCREW, 5/16-18 X 1
- (4) BAG #11—ENC SERRATED FLANGE NUT, 5/16-18
- (22) BAG #9—ENC SERRATED FLANGE NUT, 10-24
- (20) BAG #12—ENC RUBBER WASHER, FOR #10 SCREW
- (2) BAG #3—ENC SOCKET HEAD CAP SCREW, 10-24 X 5/8
- 1/8" Hex Key
- 3/8" Wrench
- 1/4" Hex Key
- 1/2" Wrench

Instructions
- Attach the Door Handle to the lefthand door using the fasteners shown.
- Attach the Magnet latch to the bottom of the lefthand door using the fasteners shown. The magnet latch should be indexed so that the magnet acts upon the lower skirt of the front panel. Open and close the door to ensure that the latch is working properly.
- Attach the Door Window to the inside mounting face of the door. Be sure to use the BAG #12—ENC rubber washers under the nuts. Do not excessively tighten the nuts. Excessive clamping force by the nuts on the polycarbonate can lead to crack formation over time. The nuts should only be snug.
- Repeat steps 1-3 for the righthand door.
- (2) Door Shear Panel
- (24) BAG #6—ENC SOCKET HEAD CAP SCREW, 10-24 X ½
- (24) BAG #9—ENC SERRATED FLANGE NUT, 10-24
- 1/8" Hex Key
- 3/8" Wrench

Instructions
- Attach the Door Shear Panel to the righthand door using the fasteners shown.
- Before tightening fasteners, push the shear panel outward as much as possible through the fastener clearances. This is to ensure that the shear panels do not stick out into the door seam and obstruct the doors from closing when finished.
- Repeat Step 1 and 2 for the lefthand door.
- (2) Side Window Assembly
- (1) Enclosure Warning Sticker
- (16) BAG #2—ENC NYLON RAISED HEAD THUMB SCREW, 10-24 X 1
- None

Instructions
- Re-route and secure all machine cables through the grommet in the rear panel.
- Attach the Enclosure Warning Sticker to the front panel where shown.
- Install the Side Window Assemblies using the thumb screws shown.
18: Spindle Break-in Program
Instructions
- Remove collet nut from spindle and set aside. Ensure the control box and spindle power are turned to the ON position.
- Download the MR-1 Spindle Break-in program from the downloads page.
- With the spindle clear of any hazards, load the program in CutControl and run the program.
- The Spindle Break-in program take approximately 2 hours to complete. Do not stop the program early- let it fully complete.
- Follow Video Instruction to load a tool to surface your baseplate.
19: Machine Lubrication and Maintenance
In this video we demonstrate the steps needed for lubrication and maintenance of the MR-1 motion system.
Instructions
- Follow Video Instruction to learn about MR-1 Lubrication and Maintenance.
20: Loading a Tool in the Spindle
In this video we'll cover loading a tool into the spindle to face your baseplate.
Instructions
- Follow Video Instruction to load a tool to surface your baseplate.
21: Surfacing the Baseplate
The following video covers the process of facing the baseplate of the MR-1.
- Jog the Z-Axis up and down multiple times to ensure it functions properly without stalling. If you experience stalling in Z, please revisit the Fine Adjustments Step →.
- Make sure that you have homed the machine first before starting.
- Double check that you are working in the G54 work coordinate system and that your X, Y, and Z-axis zero positions are set according to the video tutorial below
- Make sure that you have the appropriately loaded cutting program for the end mill size that you are using.
- Double check that your collet nut is appropriately tightened and that the tool is secure.
- If you are uncertain about the steps needed to perform this operation, please reach out to our support team for more assistance.
Instructions
- Follow Video Instruction to face off the base plate of the machine.
22: Inspect Z Alignment
In this video we cover the steps needed to inspect the Z-axis alignment of your machine and make fine shimming adjustments as needed.
Instructions
- Follow Video Instruction to inspect your Z Alignment.
- If you need additional shims beyond the ones provided in order to achieve proper Z-Axis Alignment, we recommend using scissors to cut suitable shims from the leftover Y-Axis Rail Course and Fine shims.
23: Set Travel Compensation
In this video we demonstrate the steps needed to measure and set the pitch travel compensation for your X, Y, and Z axes.
Instructions
- Follow Video Instruction to set your Travel Compensation.
24: Adjust Spindle Position
The MR-1 spindle has two positions; UP and DOWN. The Spindle ships in the DOWN position from our factory so that an end mill can be used to reach the Base Plate for facing. In this video, we demonstrate the steps needed to adjust the spindle position to the UP configuration.
Instructions
- Follow Video Instruction to adjust the MR-1 Spindle position.
25: Mounting a Vise
In this video we demonstrate the steps needed to mount our Low Profile Modular Vise onto the MR-1 base plate and square the fixed jaw to the X-axis.
Instructions
- Follow Video Instruction to mount a vise.
Control Computer Setup
The MC4000 Windows 10 Control Computer is part of the Control Kit you may have ordered with your machine. It comes ready to go with all of the hardware you need to run your MR-1 CNC Machine but there are a few software setup tasks required before you are ready to cut.
-
Connect your MC4000 and HD Touchscreen
Your MC4000 PC should be connected to power and the HD touchscreen monitor via HDMI and USB. The included HD Touchscreen's touch capability requires USB connection to the MC4000. The MC4000 must also be connected to the Electronics via USB. If you wish to utilize the wireless keyboard pendant you may also plug in the USB dongle at this stage.
-
Create your Windows User Account and Complete Windows Setup
Boot up your MC4000 and you will be presented with the standard Windows Out-Of-Box Experience and user creation as with any new Windows PC. During this proccess you will be asked to accept the Windows EULA, select keyboard layouts and to connect to the internet.
Our recommended setup procedure for the MC4000 is to use an offline user account. This is a user account that is not connected to an online Microsoft account. To do this, when prompted to connect to WiFi click the ‘Skip Step’ button in the lower corner. You can of course use an online Microsoft user account if the location of your MR-1 has consistent internet access.
You will create a user name, password, and account recovery hints.
![]()
It is also recommended that you do not sign up for or agree to options for Office 365, Cortana, or any of the privacy settings as these can take up valuable system resources.
![]()
-
Connect to the Internet
Once your Windows account is created and you have set up your PC with a user account, you will need to connect to the internet. In order to download the software and latest driver updates necessary for operation, you will need to connect your PC to WiFi or to a wired connection via the ethernet port.
-
Download CutControl
Download the latest version of CutControl using the ‘Download CutControl’ Shortcut on your MC4000 Desktop or by navigating to the Langmuir Systems Downloads page.
- Install following the CutControl Installer instructions.
-
Disable the Touch Feedback
This is a Windows setting that will make the CutControl experience with your MR-1 CNC Mill better by eliminating the hover square over your touch point on your HD Touchscreen while continuously jogging.
-
Verify Sleep Settings
Your MC4000 Control Computer should be acting as a kiosk and should never ‘go to sleep’. Verify all Sleep settings are set to ‘Never’ in Settings > Power & Sleep.
![]()
Cutting Parameters
Langmuir Systems provides customers the following Cutting Parameters Quick Reference Chart to use when programming cuts on MR-1. We believe that these values are a good, conservative starting point and we strongly recommend using these parameters when first cutting parts on MR-1. If you wish to push the machine beyond these starting values, we always recommend first making test cuts before running a new program. If you have any questions please reach out to tech support We are here to help!
This Cutting Parameters Quick Reference Chart is also available as a downloadable PDF.


First Cuts on MR-1
Install CutControl
Download the latest version of CutControl by visiting our website and following the onscreen prompts to install CutControl to the controller computer. If you do not have internet setup on your computer, you will need to save the installer (.MSI) file onto a thumb flash drive and then install this from the flash drive. Use the CutControl Guide to learn more about the software used to control your MR-1.
Verify Connections and Turn On MR-1
Verify that all connections to the CNC electronics box are correct. If your machine is touching any of the limit switches, manually push the machine of the switches so that all limit switches are open. Next, turn on the machine by flipping the power switch at the rear of the electronics box. You should hear power transmit to the stepper motors and a light humming noise from the motors is normal.
Start CutControl
Open CutControl software. The 'MR-1' Machine should automatically connect in the top right of the screen. Verify that the machine USB cable is plugged into both the computer and the electronics box.
Home your MR-1
Before jogging the machine, a homing operation will need to be performed. Once everything is clear, press the Homing button in CutControl. Note: If an alarm is popped during homing when the Y1 and Y2 limit switches are triggered it is possible that your gantry had a substantial racking before homing. Perform the homing procedure again if this is the case. Another cause for the alarm is that your Y1 and Y2 stepper motor plugs are switched at the electronics box. Y1 should control the motor on the left side of the gantry and Y2 should be on the right side.
Download & Run the Spindle Break-In
Follow the Spindle Break-in instructions to download and run the Spindle Break-in program before any cutting is performed on the MR-1.
Make Your First Parts
Use the provided Cutting Parameters to program your first parts and cut them on the MR-1.
Tool Setter & Touch Probe Tutorials
Touch Probe Tutorial
In this video we demonstrate the steps needed to setup and operate the Langmuir Systems Digital Touch Probe.
Instructions
- Follow Video Instruction to learn how to use the MR-1 Touch Probe.
Tool Setter Tutorial
In this video we demonstrate the steps needed to mount and operate the Langmuir Systems Automatic Tool Setter.
Instructions
- Follow Video Instruction to learn how to use the MR-1 Tool Setter.
Legal
Warranty
All Langmuir Systems products are covered by a 12 month limited warranty on hardware and 6 month limited warranty on electronics. The terms of the warranty are listed below:
- Warranty benefits only apply to the original purchaser and expire if goods are resold. You must provide proof of purchase and your machine's unique serial number (if applicable) via email before a warranty claim may be filed.
- The buyer has 30 days after delivery to report and request to receive any missing items. Langmuir Systems will ship the missing items to the buyer within 10 business days. Langmuir Systems has the right to refuse replacement of items to any buyer that it suspects may not be truthful. The buyer is responsible for the replacement of any missing items after the 30 day period expires.
- Langmuir Systems guarantees the goods received to be defect free for a period of 12 months for
mechanical hardware and 6 months for electronics. Items that meet the following conditions will be
replaced free of charge:
- Items that are received in defective and unusable condition.
- Items that become defective and unusable after use as a result of a manufacturing, design, or material defect.
- The warranty does not cover the following types of defects:
- Defects that do not negatively affect the items functionality. Examples may include scratches, dings, dents, and surface abrasions.
- Defects that are caused by improper assembly.
- Defects that are caused by improper use.
- Defects that are caused by inadequate or incorrect routine maintenance.
- Defects that are caused by improper storage of the item or exposure of the item to the elements.
- Defects that are caused by normal wear and tear.
- If a damaged or defective item is covered by the warranty, Langmuir Systems reserves the right to request that the defective item be shipped back before supplying a replacement. Langmuir Systems will supply a shipping label to cover the expense of the return shipment. The Buyer is responsible for handling and packaging. Langmuir Systems will ship either a refurbished or brand new replacement item within 5 business days of receiving the defective item.
Return and Refund Policy
All products sold directly by Langmuir Systems are eligible for return and refund. The terms of the return and refund policy are listed below:
- Only the original buyer of the item is eligible to return the item for a refund. Proof of purchase is required in order to be eligible for a refund.
- A return must be requested within 30 calendar days following the delivery of the item. Return requests after the eligibility period will be denied.
- The buyer is responsible for all shipping and handling costs associated with shipping the item back.
- Items that are eligible for return must meet all of the following requirements:
- The item must be in unused condition.
- The item must be free of defects.
- The item must be received in the original packaging.
- Langmuir Systems will inspect the item within 5 business days of receiving it. The buyer will be informed if it passes inspection and thus is eligible for a refund.
- If Langmuir Systems concludes that the item meets the refund eligibility requirements, a refund for the original transaction amount minus a 20% restocking fee will be issued to the Buyer within 5 business days following the completion of the inspection.
- 'In person' returns require permission from Langmuir Systems in advance.
- All purchases are subject to a non-refundable 2.4% merchant transaction fee.
